> ## Documentation Index
> Fetch the complete documentation index at: https://docs.runmaestro.ai/llms.txt
> Use this file to discover all available pages before exploring further.
# Auto Run + Playbooks
> Process markdown checklists with AI agents using Auto Run documents and reusable Playbooks.
Auto Run automates AI-driven work in one of two modes, chosen with the **Spec-Driven** / **Goal-Driven** toggle at the top of the Run dialog:
* **Spec-Driven** runs markdown checklist documents to completion. You write the work as checkbox tasks in a folder of `.md` files, and Maestro works through them one by one, spawning a fresh AI session for each task (or each document). A reusable collection of these documents is a **Playbook**. Reach for this when you already know the steps.
* **Goal-Driven** pursues a single free-text objective with no checklist. Each iteration spawns a fresh agent that makes one increment of progress, reports how far along it is, and exits, repeating until the goal is reached or the run stops. Reach for this for open-ended work where you can't list the steps up front.
Most of this guide covers Spec-Driven documents and Playbooks. Jump to [Goal-Driven Mode](#goal-driven-mode) for that workflow.
 ## Setting Up Auto Run
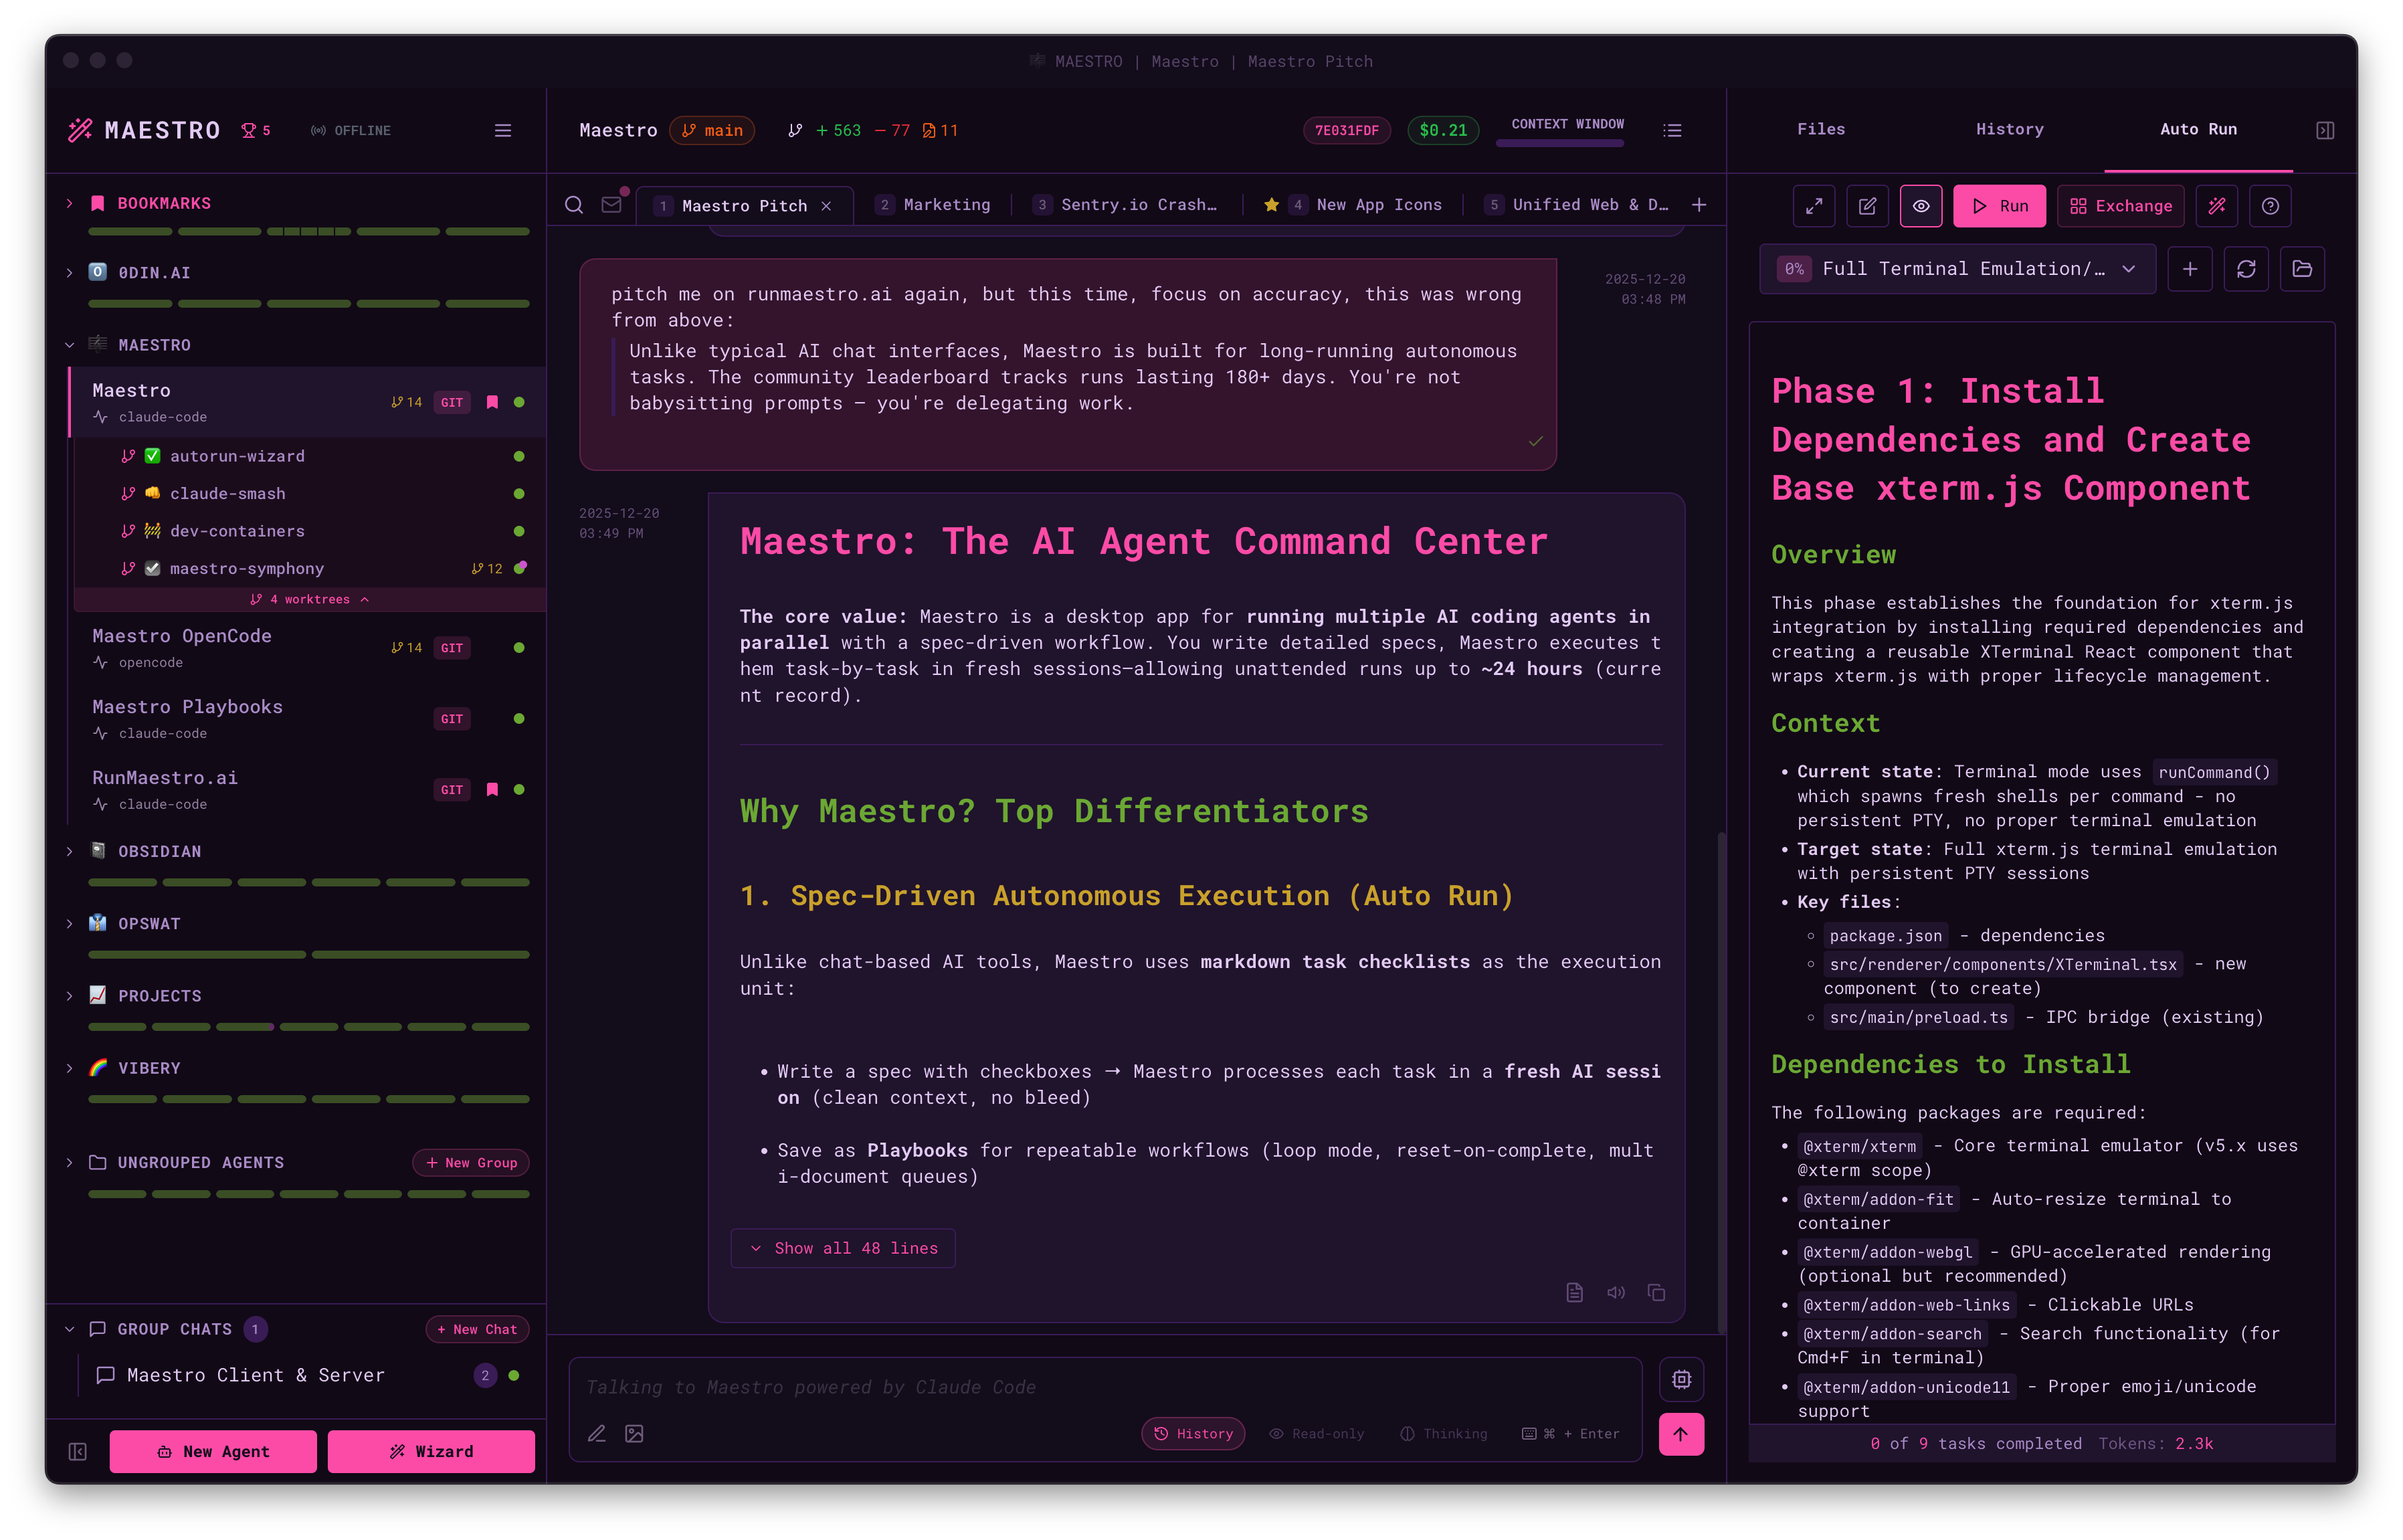
1. Navigate to the **Auto Run** tab in the right panel (`Cmd+Shift+1`)
2. Select a folder containing your markdown task documents
3. Each `.md` file becomes a selectable document
## Creating Tasks
Use markdown checkboxes in your documents:
```markdown theme={"theme":"dracula"}
# Feature Implementation Plan
- [ ] Implement user authentication
- [ ] Add unit tests for the login flow
- [ ] Update API documentation
```
**Tip**: Press `Cmd+L` (Mac) or `Ctrl+L` (Windows/Linux) to quickly insert a new checkbox at your cursor position.
### Task Granularity: Two Approaches
There are two viable ways to structure work across Auto Run documents. Pick the one that fits your project - they can also coexist.
**1. Many tasks per document (classic approach)**
One document holds a long list of checkboxes; the runner walks through them serially, each in a fresh session.
* Good when tasks are small, independent, and share a common framing that's cheap to restate in the document body.
* Each task gets a clean context, so the agent doesn't drift across them.
* Tradeoff: the agent has to re-derive shared context for every task from whatever lives in the document.
**2. One task (or a few) per document (recommended for richer work)**
Each document is a focused brief - heavy on context, light on checkboxes. Often just a single `- [ ]` "execute the plan" task at the bottom.
* Good when each unit of work needs substantial setup, references, constraints, or prior decisions to do well.
* Modern agents have large context windows, so loading a richer document per task is cheap and usually produces better results than splintering it into many small checkboxes that each lose the shared framing.
* Compose multi-step workflows by chaining several of these focused documents inside a Playbook instead of stuffing them into one file.
* Tradeoff: more files to manage; the dropdown list grows.
**Rule of thumb:** if you find yourself repeating the same context paragraph above several checkboxes in one document, that's a signal to split into multiple focused documents and let the Playbook handle ordering.
## Running Single Documents
1. Select a document from the dropdown
2. Click the **Run** button (or the ▶ icon)
3. Customize the agent prompt if needed, then click **Go**
## Running Multiple Auto Run Documents
Auto Run supports running multiple documents in sequence:
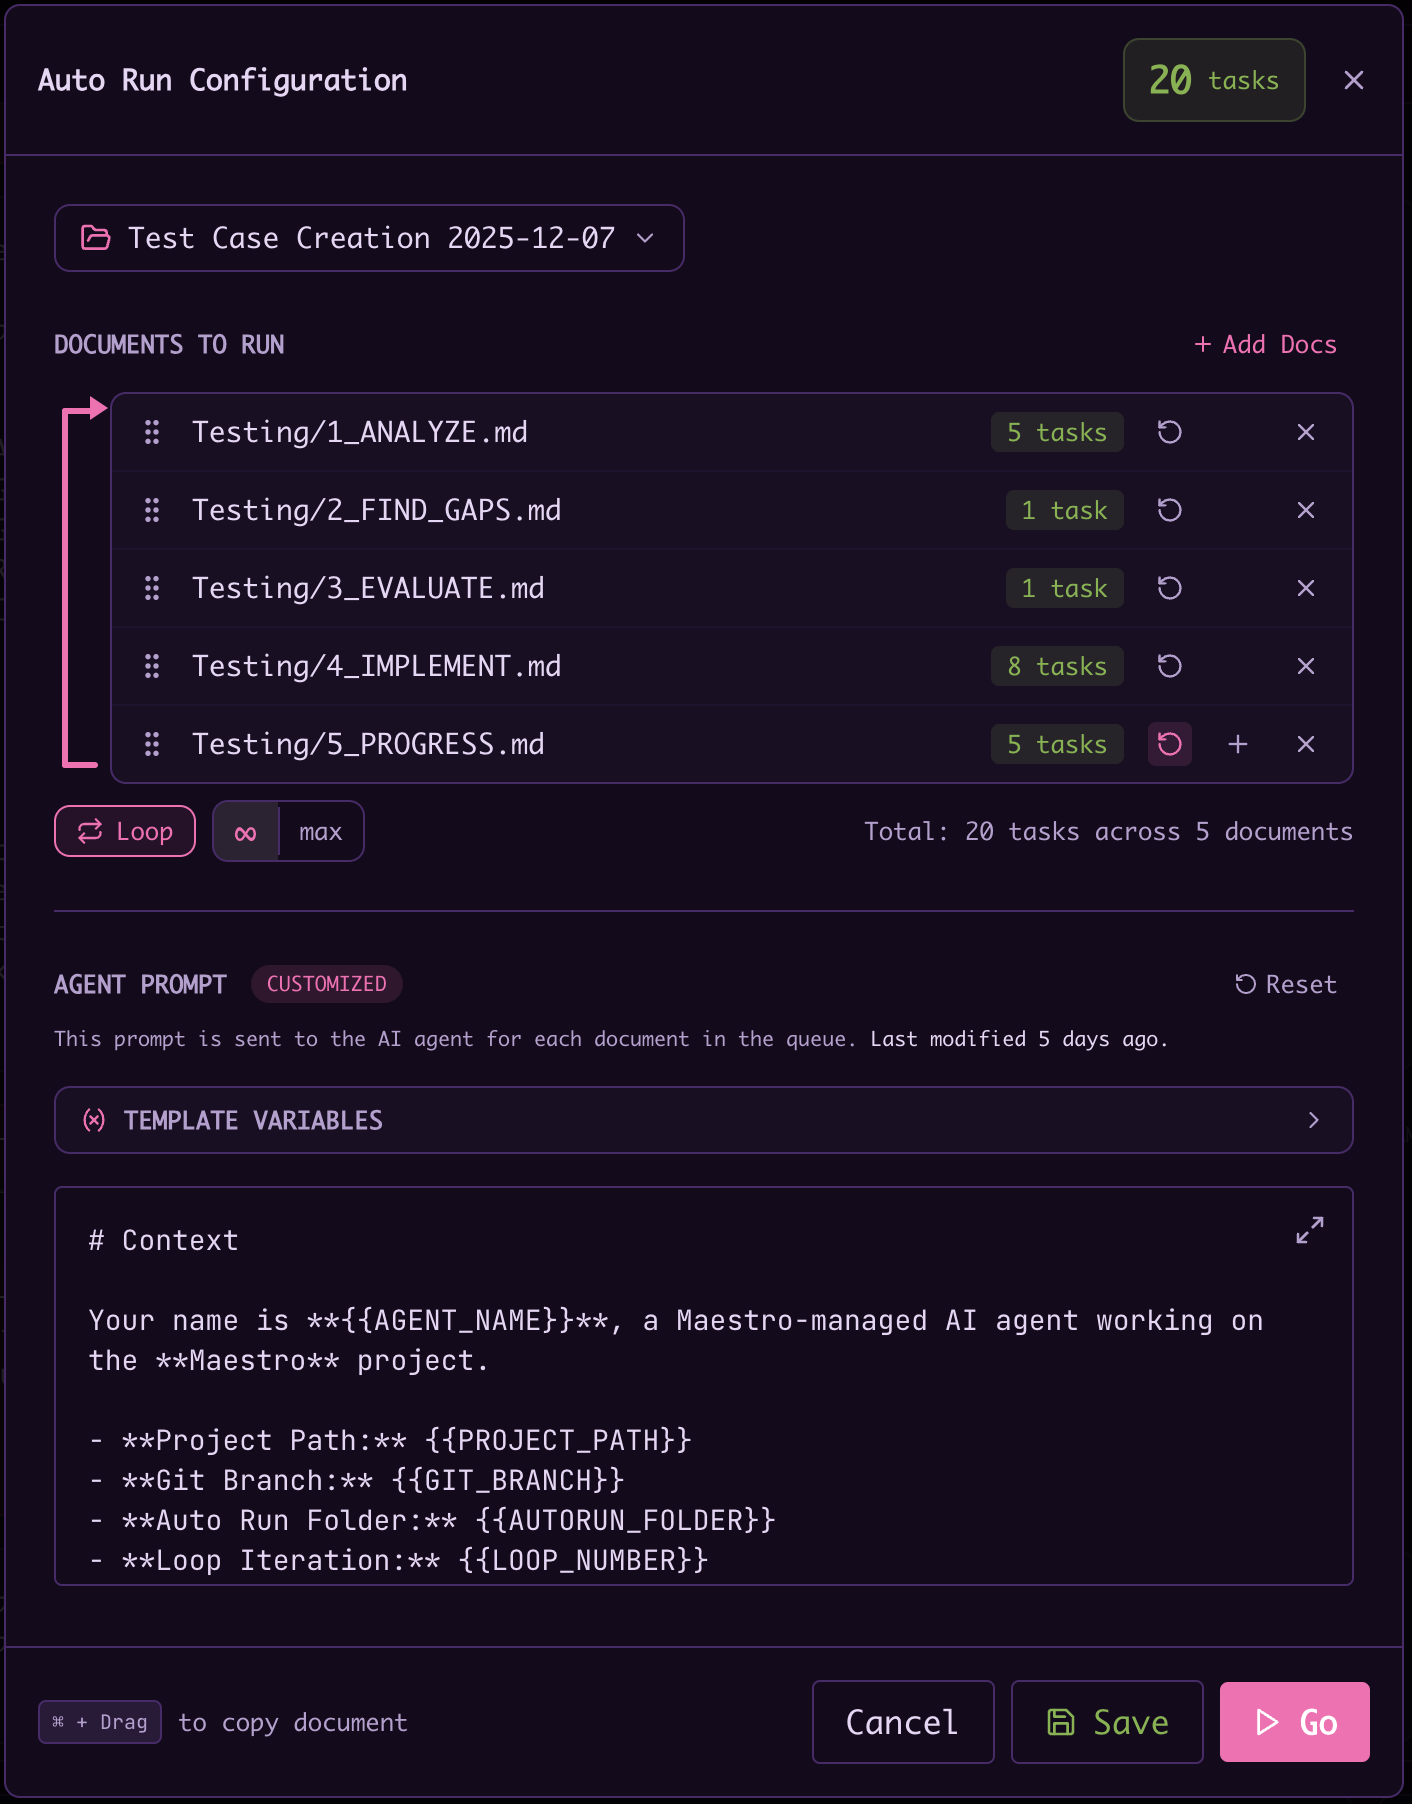
1. Click **Run** to open the Auto Run configuration modal
2. Click **+ Add Docs** to add more documents to the queue
3. Drag to reorder documents as needed
4. Configure options per document:
* **Reset on Completion** - Creates a working copy in `runs/` subfolder instead of modifying the original. The original document is never touched, and working copies (e.g., `TASK-1735192800000-loop-1.md`) serve as audit logs.
* **Duplicate** - Add the same document multiple times
5. Enable **Loop Mode** to cycle back to the first document after completing the last
6. Click **Go** to start running documents
## Fresh Context: Task vs Document
The run configuration modal has a **Fresh context per** toggle that controls how context is scoped as the runner works through a document. This is distinct from [task granularity](#task-granularity-two-approaches) above - granularity is how you *structure* a document, while this is how Maestro *executes* it.
**Task** - A new agent is spawned for each unchecked task, with a clean context every time.
* Maximum isolation; the agent never drifts across tasks.
* Each task must be fully self-contained, since the agent sees nothing from previous tasks except what's written in the document.
* The right choice for most agents.
**Document** - A single agent walks every unchecked task in the document in one continuous session, carrying context forward between tasks.
* Best for agents with very large context windows, and for work where later tasks build on earlier ones.
* Requires enough context window to hold a whole document's worth of work in one session.
**Auto-selection:** Maestro picks the mode by combining the running agent's context window with the average task count across the documents you've selected. The tasks-per-doc threshold scales with the window - **5** at 256K or less, **10** at 512K, **20** at 1M - and below the threshold Maestro recommends **Document**, at/above it **Task**. Selecting different documents recomputes the recommendation. If you toggle to the non-recommended mode, the modal surfaces a small note explaining what it would have picked and why, but respects your choice. A loaded Playbook's saved mode always takes precedence, and once you've manually toggled, future document-selection changes don't yank the mode back.
> **Tip:** Author tasks to be self-contained regardless of mode. Document mode is an optimization, not a license to write tasks that depend on chat memory.
## Playbooks
Save your Auto Run configurations as Playbooks for reuse:
1. Configure your documents, order, and options
2. Click **Save as Playbook** and enter a name
3. Load saved playbooks from the **Load Playbook** dropdown
4. Update or discard changes to loaded playbooks
## Setting Up Auto Run
1. Navigate to the **Auto Run** tab in the right panel (`Cmd+Shift+1`)
2. Select a folder containing your markdown task documents
3. Each `.md` file becomes a selectable document
## Creating Tasks
Use markdown checkboxes in your documents:
```markdown theme={"theme":"dracula"}
# Feature Implementation Plan
- [ ] Implement user authentication
- [ ] Add unit tests for the login flow
- [ ] Update API documentation
```
**Tip**: Press `Cmd+L` (Mac) or `Ctrl+L` (Windows/Linux) to quickly insert a new checkbox at your cursor position.
### Task Granularity: Two Approaches
There are two viable ways to structure work across Auto Run documents. Pick the one that fits your project - they can also coexist.
**1. Many tasks per document (classic approach)**
One document holds a long list of checkboxes; the runner walks through them serially, each in a fresh session.
* Good when tasks are small, independent, and share a common framing that's cheap to restate in the document body.
* Each task gets a clean context, so the agent doesn't drift across them.
* Tradeoff: the agent has to re-derive shared context for every task from whatever lives in the document.
**2. One task (or a few) per document (recommended for richer work)**
Each document is a focused brief - heavy on context, light on checkboxes. Often just a single `- [ ]` "execute the plan" task at the bottom.
* Good when each unit of work needs substantial setup, references, constraints, or prior decisions to do well.
* Modern agents have large context windows, so loading a richer document per task is cheap and usually produces better results than splintering it into many small checkboxes that each lose the shared framing.
* Compose multi-step workflows by chaining several of these focused documents inside a Playbook instead of stuffing them into one file.
* Tradeoff: more files to manage; the dropdown list grows.
**Rule of thumb:** if you find yourself repeating the same context paragraph above several checkboxes in one document, that's a signal to split into multiple focused documents and let the Playbook handle ordering.
## Running Single Documents
1. Select a document from the dropdown
2. Click the **Run** button (or the ▶ icon)
3. Customize the agent prompt if needed, then click **Go**
## Running Multiple Auto Run Documents
Auto Run supports running multiple documents in sequence:
1. Click **Run** to open the Auto Run configuration modal
2. Click **+ Add Docs** to add more documents to the queue
3. Drag to reorder documents as needed
4. Configure options per document:
* **Reset on Completion** - Creates a working copy in `runs/` subfolder instead of modifying the original. The original document is never touched, and working copies (e.g., `TASK-1735192800000-loop-1.md`) serve as audit logs.
* **Duplicate** - Add the same document multiple times
5. Enable **Loop Mode** to cycle back to the first document after completing the last
6. Click **Go** to start running documents
## Fresh Context: Task vs Document
The run configuration modal has a **Fresh context per** toggle that controls how context is scoped as the runner works through a document. This is distinct from [task granularity](#task-granularity-two-approaches) above - granularity is how you *structure* a document, while this is how Maestro *executes* it.
**Task** - A new agent is spawned for each unchecked task, with a clean context every time.
* Maximum isolation; the agent never drifts across tasks.
* Each task must be fully self-contained, since the agent sees nothing from previous tasks except what's written in the document.
* The right choice for most agents.
**Document** - A single agent walks every unchecked task in the document in one continuous session, carrying context forward between tasks.
* Best for agents with very large context windows, and for work where later tasks build on earlier ones.
* Requires enough context window to hold a whole document's worth of work in one session.
**Auto-selection:** Maestro picks the mode by combining the running agent's context window with the average task count across the documents you've selected. The tasks-per-doc threshold scales with the window - **5** at 256K or less, **10** at 512K, **20** at 1M - and below the threshold Maestro recommends **Document**, at/above it **Task**. Selecting different documents recomputes the recommendation. If you toggle to the non-recommended mode, the modal surfaces a small note explaining what it would have picked and why, but respects your choice. A loaded Playbook's saved mode always takes precedence, and once you've manually toggled, future document-selection changes don't yank the mode back.
> **Tip:** Author tasks to be self-contained regardless of mode. Document mode is an optimization, not a license to write tasks that depend on chat memory.
## Playbooks
Save your Auto Run configurations as Playbooks for reuse:
1. Configure your documents, order, and options
2. Click **Save as Playbook** and enter a name
3. Load saved playbooks from the **Load Playbook** dropdown
4. Update or discard changes to loaded playbooks
 ### Inline Wizard
Generate new playbooks from within an existing session using the **Inline Wizard**:
1. Type `/wizard` in any AI tab (or click the Wizard button in the Auto Run panel)
2. Have a conversation with the AI about your project goals
3. Watch the confidence gauge build as the AI understands your requirements
4. At 80%+ confidence, the AI generates detailed Auto Run documents
### Inline Wizard
Generate new playbooks from within an existing session using the **Inline Wizard**:
1. Type `/wizard` in any AI tab (or click the Wizard button in the Auto Run panel)
2. Have a conversation with the AI about your project goals
3. Watch the confidence gauge build as the AI understands your requirements
4. At 80%+ confidence, the AI generates detailed Auto Run documents
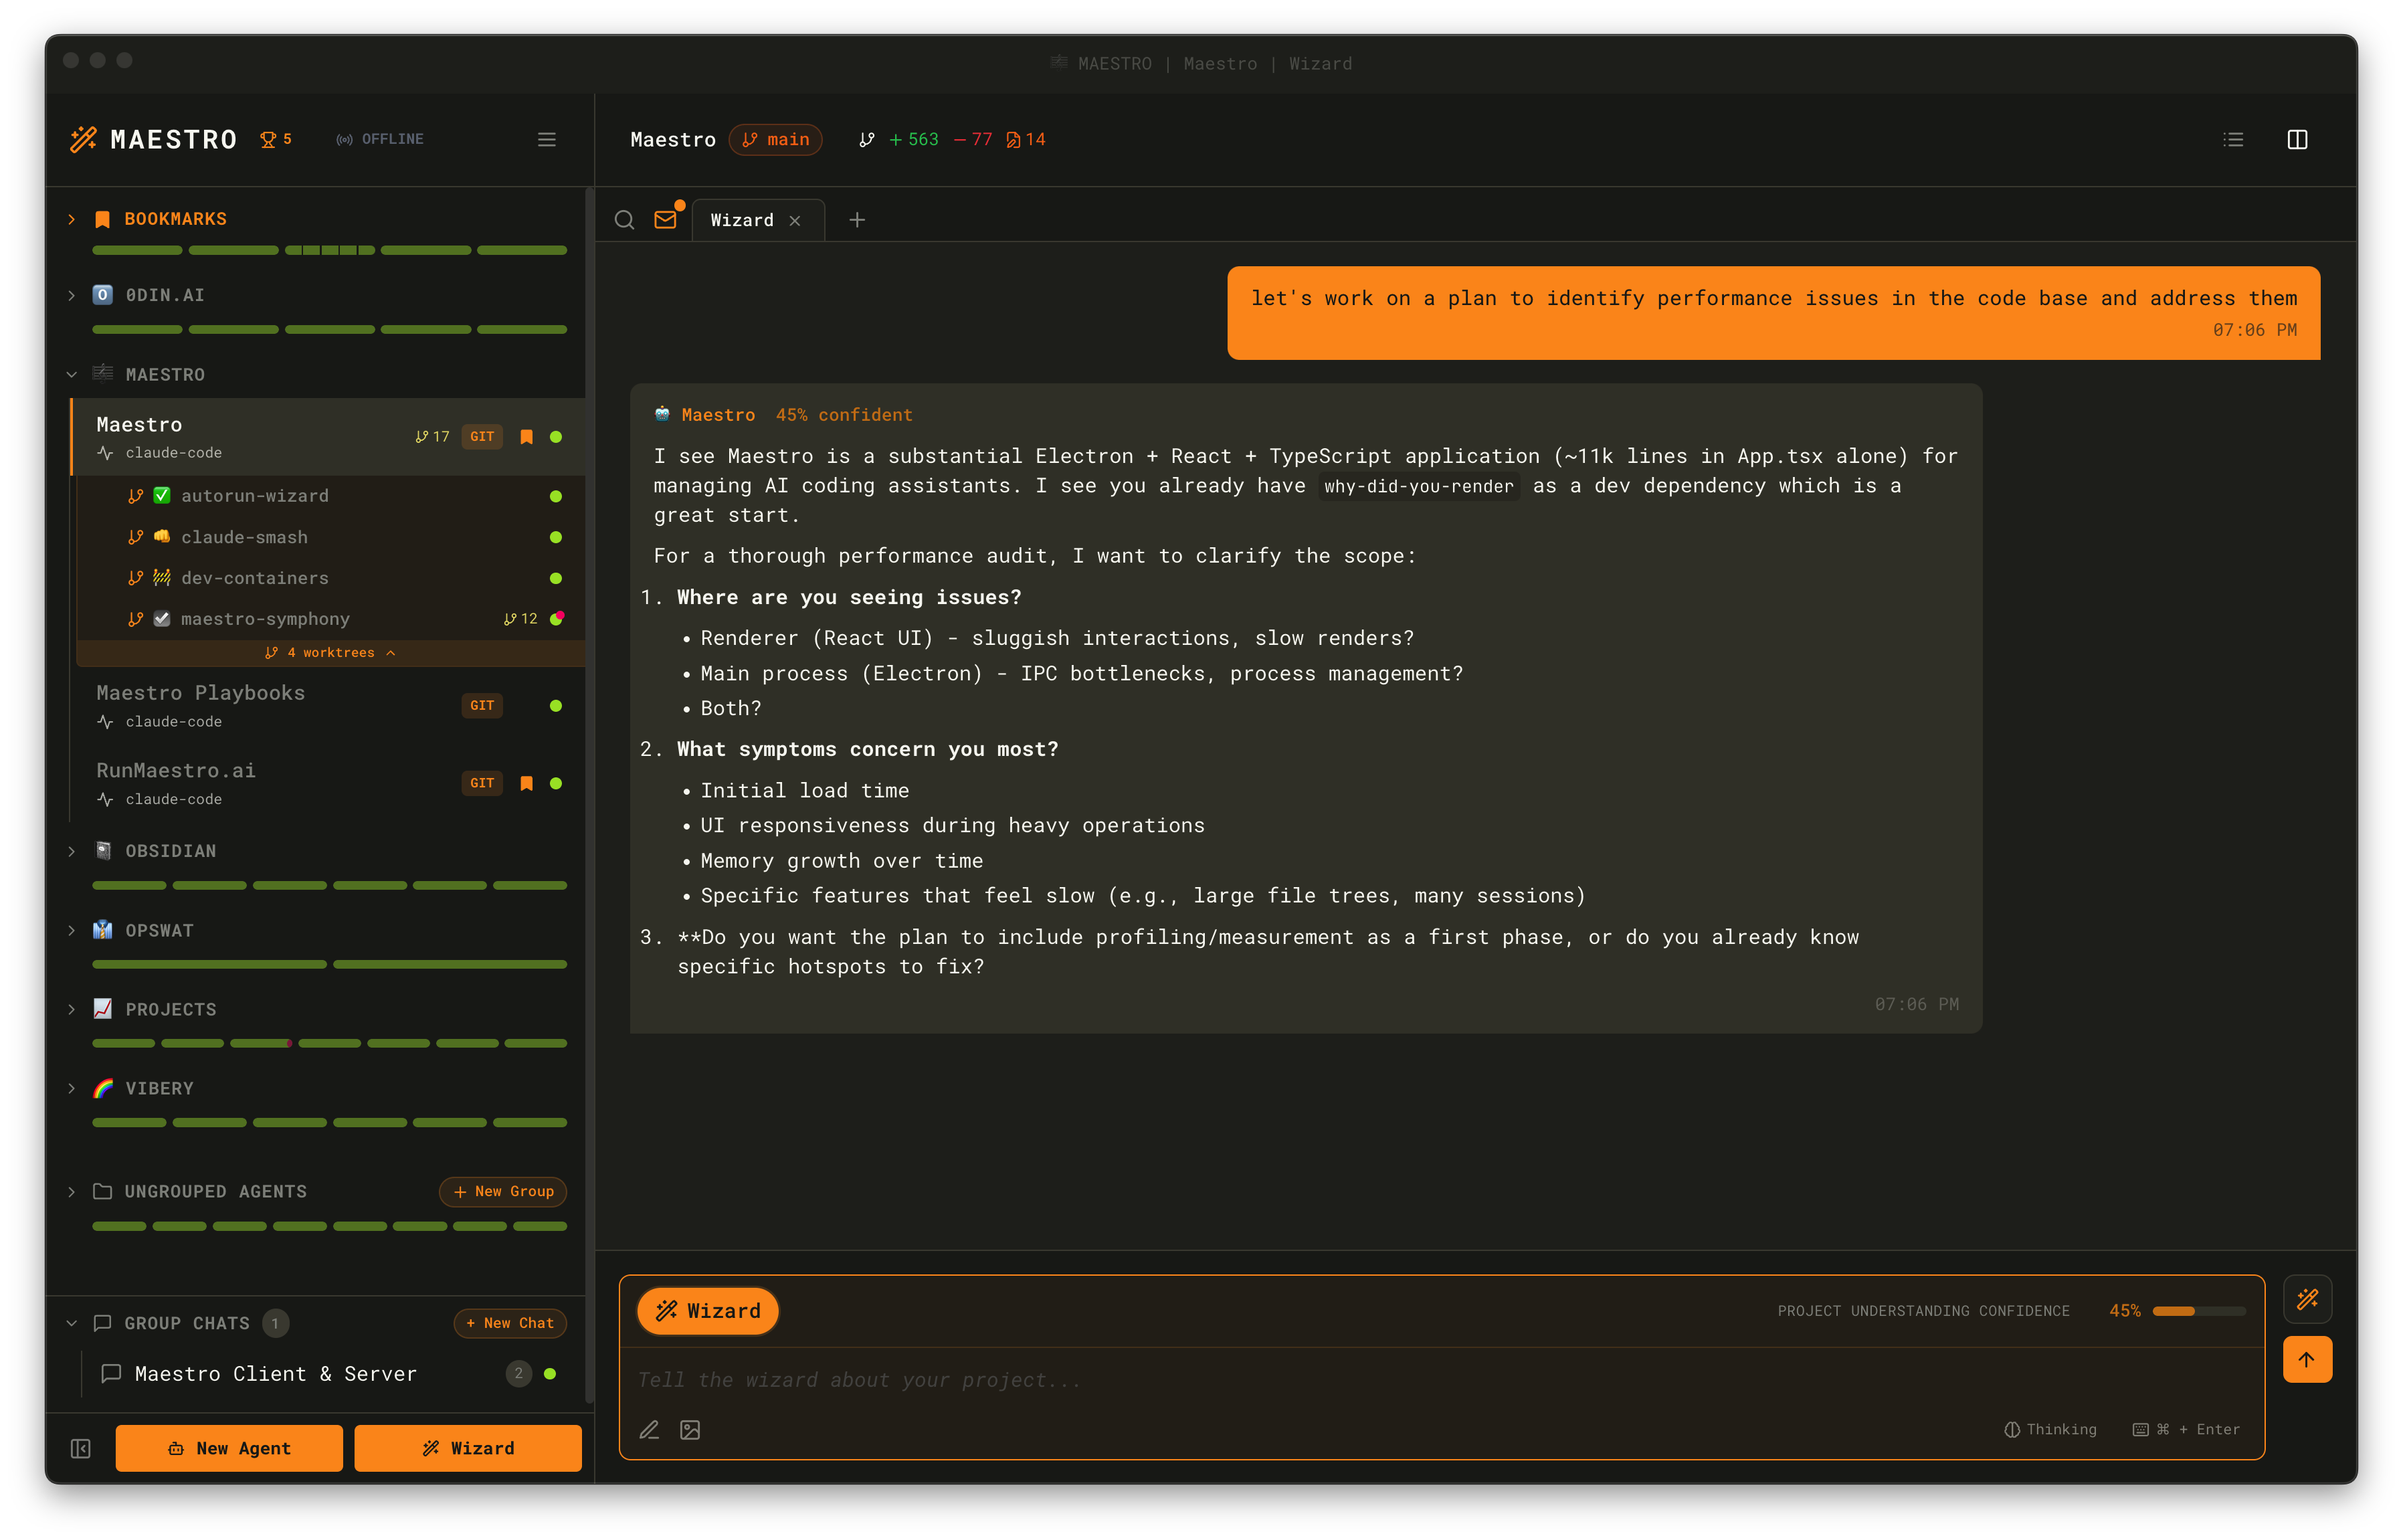 The Inline Wizard creates documents in a unique subfolder under your Auto Run folder, keeping generated playbooks organized. When complete, your tab is renamed to reflect the project and you can immediately start running the generated tasks.
### Playbook Exchange
Looking for pre-built playbooks? The [Playbook Exchange](./playbook-exchange) offers community-contributed playbooks for common workflows like security audits, code reviews, and documentation generation. Open it via Quick Actions (`Cmd+K`) or click the Exchange button in the Auto Run panel.
## Goal-Driven Mode
Everything above describes **Spec-Driven** runs - documents of checkboxes worked to completion. **Goal-Driven** mode is the alternative: switch to the **Goal-Driven** tab in the Run dialog to chase a free-text objective instead of a document of checkboxes.
Each iteration spawns a fresh agent that makes one increment of real progress toward the goal, reports how far along it is, and exits. The next iteration picks up where it left off, until the goal is reached or the run stops. Because there are no checklist documents, the playbook controls and the "Follow active task" option don't appear in this mode.
The Inline Wizard creates documents in a unique subfolder under your Auto Run folder, keeping generated playbooks organized. When complete, your tab is renamed to reflect the project and you can immediately start running the generated tasks.
### Playbook Exchange
Looking for pre-built playbooks? The [Playbook Exchange](./playbook-exchange) offers community-contributed playbooks for common workflows like security audits, code reviews, and documentation generation. Open it via Quick Actions (`Cmd+K`) or click the Exchange button in the Auto Run panel.
## Goal-Driven Mode
Everything above describes **Spec-Driven** runs - documents of checkboxes worked to completion. **Goal-Driven** mode is the alternative: switch to the **Goal-Driven** tab in the Run dialog to chase a free-text objective instead of a document of checkboxes.
Each iteration spawns a fresh agent that makes one increment of real progress toward the goal, reports how far along it is, and exits. The next iteration picks up where it left off, until the goal is reached or the run stops. Because there are no checklist documents, the playbook controls and the "Follow active task" option don't appear in this mode.
 ### Configuring a Goal Run
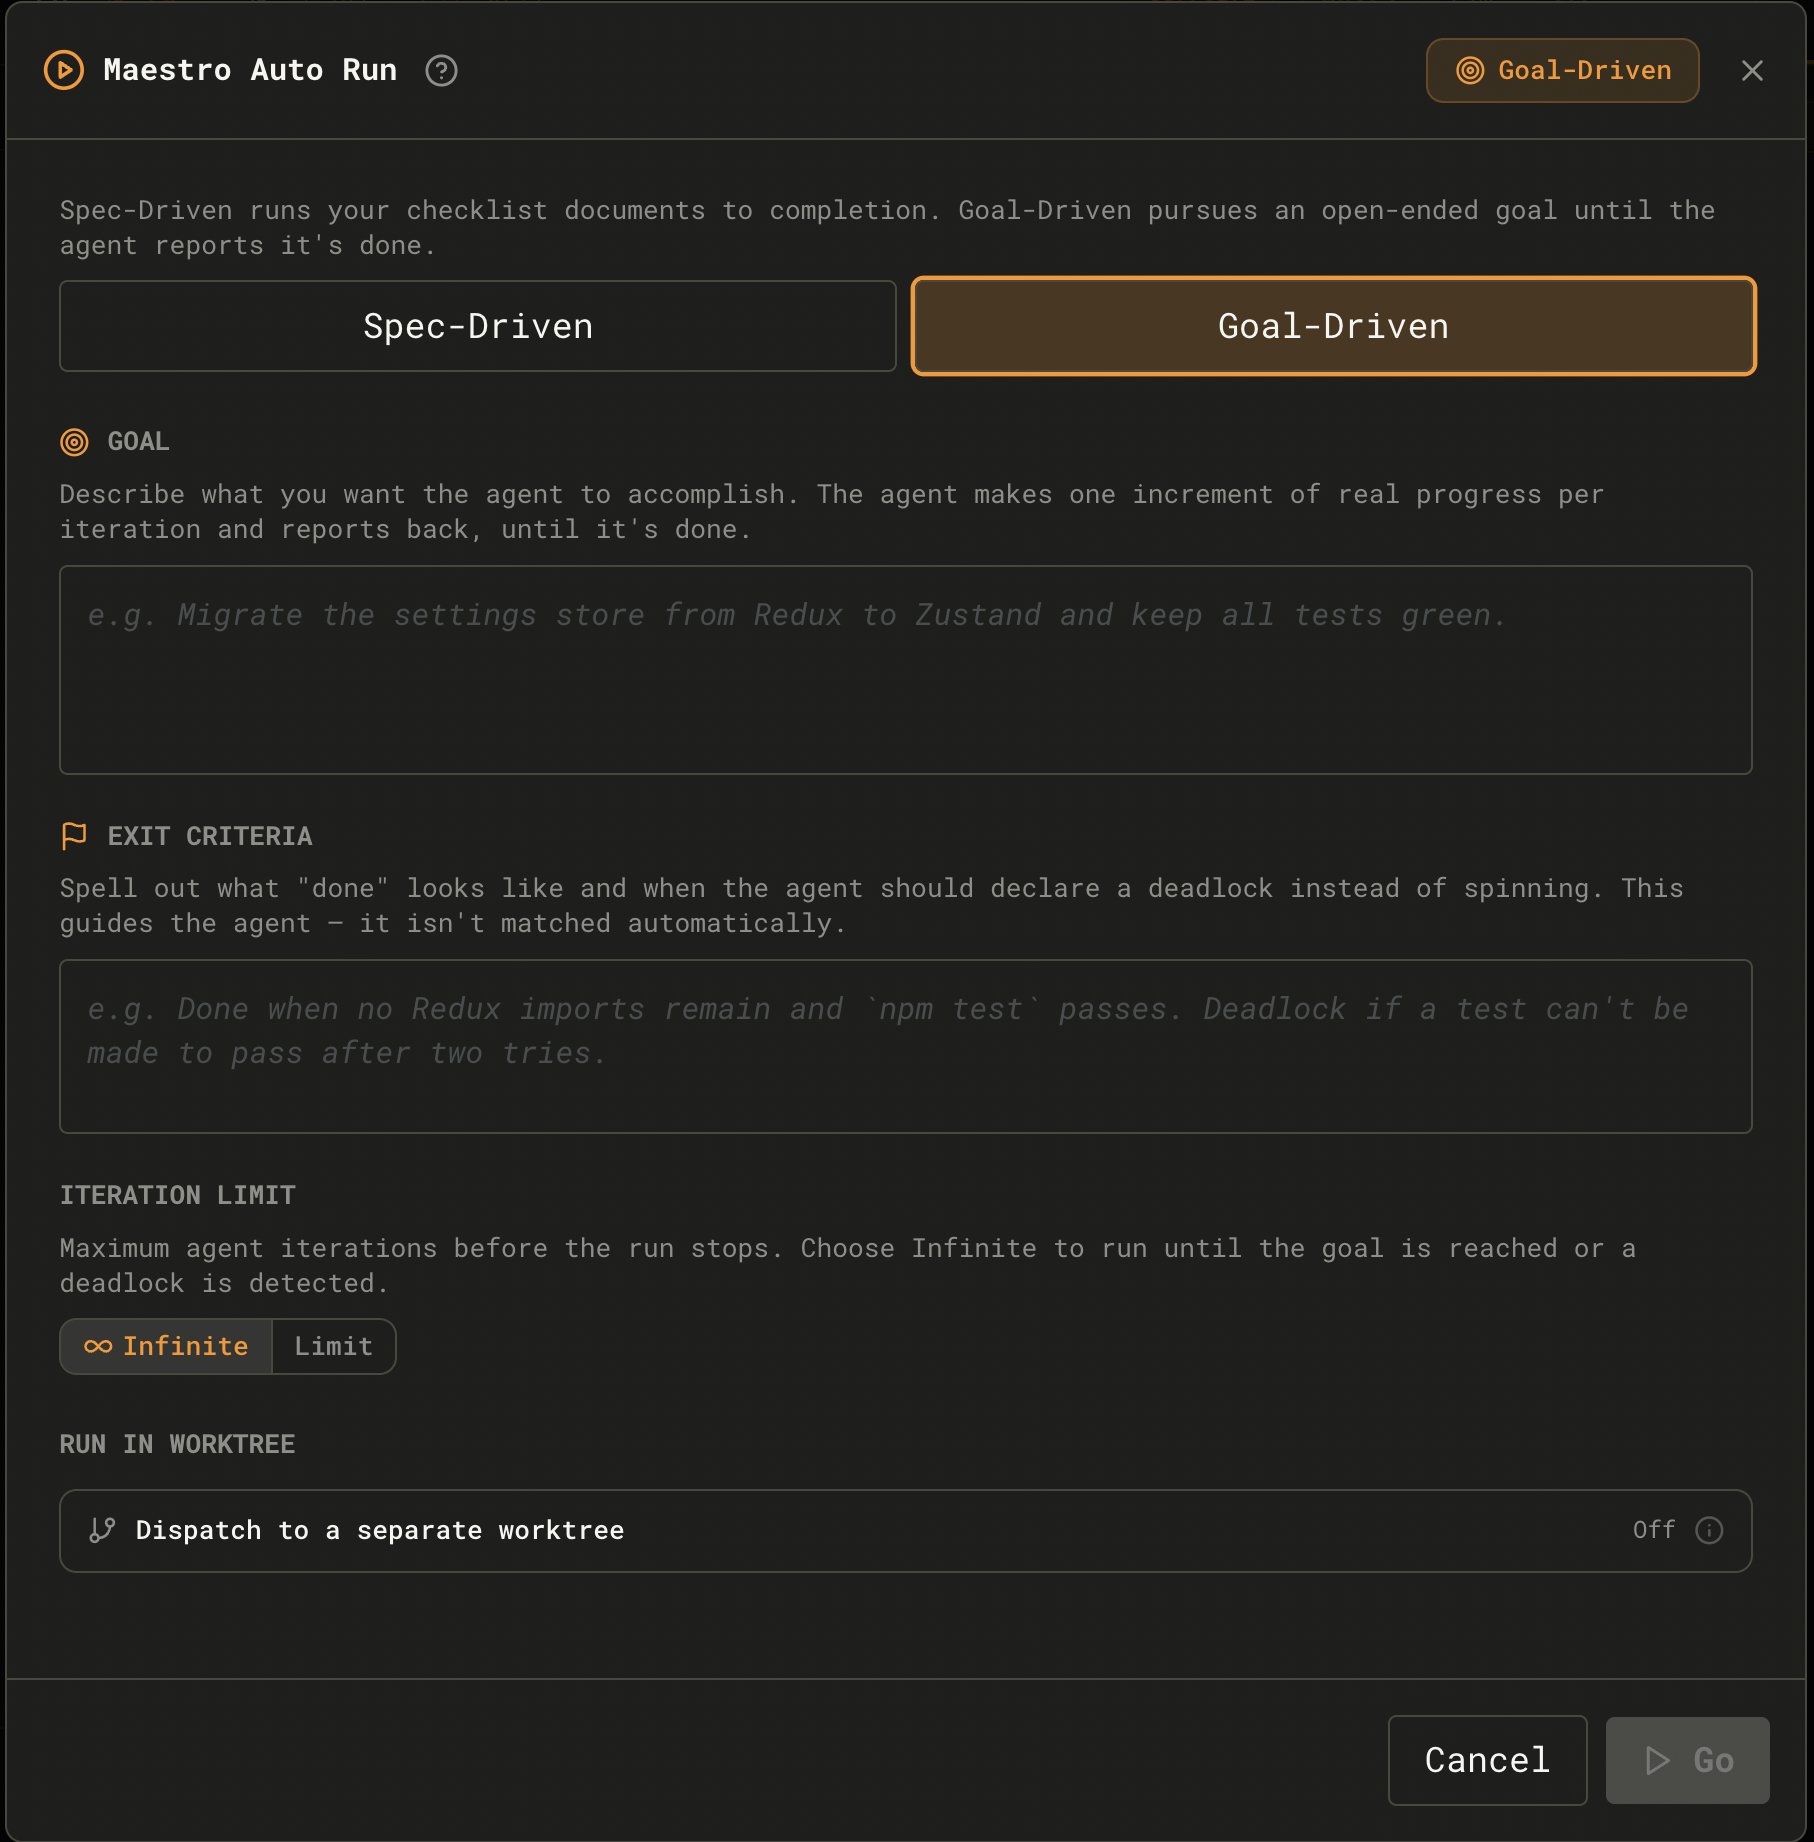
Three inputs configure a run:
* **Goal** - what you want accomplished, in plain language (e.g., "Migrate the settings store from Redux to Zustand and keep all tests green").
* **Exit Criteria** - what "done" looks like and when the agent should declare a deadlock instead of spinning. This guides the agent; it is **not** matched automatically.
* **Iteration Limit** - a cap on how many iterations may run, or **Infinite** to run until the goal is reached or a deadlock is detected.
Like Spec-Driven runs, a goal run can be [dispatched into an isolated git worktree](#run-in-worktree) so your main working tree stays clean.
### Progress Markers
At the end of every iteration the agent reports an honest 0-100 self-assessment on its own line. The engine reads this to drive the progress bar and decide whether to run again:
```html theme={"theme":"dracula"}
```
The `| rationale` note after the number is optional but shows up in the progress UI. A response with no progress marker is treated as zero progress and counts toward a stall.
### How a Goal Run Stops
A goal run ends on any of four conditions:
* **Completed** - the agent reports `progress 100`, or emits the explicit marker ``.
* **Deadlock** - the agent hits a true blocker it cannot work around and declares it with ``.
* **Max iterations** - a finite iteration limit is reached before the goal completes.
* **Stalled** - progress doesn't move upward for three iterations in a row, so the run stops instead of spinning.
The stop reason and final progress are recorded in the **History** panel.
## Progress Tracking
The runner will:
* Process tasks serially from top to bottom
* Skip documents with no unchecked tasks
* Show progress: "Document X of Y" and "Task X of Y"
* Mark tasks as complete (`- [x]`) when done
* Log each completion to the **History** panel
## Thought Stream
While a run is active, you can watch the agent's live reasoning without changing any settings. In the **Auto Run** card, click **View Thoughts** (the brain icon) to open the **Thought Stream** - a floating, searchable panel that streams the agent's thinking as it works.
It works the same for **Spec-Driven** and **Goal-Driven** runs, because both flow through the same agent. The panel captures the raw reasoning stream directly, so it shows thoughts even when an AI tab's "show thinking" display is turned off.
* **Newest on top** - the live thought sits at the top and grows; scroll down to read the history of the run.
* **Timestamped blocks** - a continuous burst of thinking is grouped into one block with a time stamp; a pause (or a switch between parallel tabs) starts a new block.
* **Formatted** - thoughts render as formatted markdown (headings, lists, bold, inline code, code fences), so structured reasoning stays readable.
* **Search** - filter the captured thoughts with the search box; matches are highlighted.
The button doubles as the live indicator: while capturing it pulses and reads **Capturing**.
**Open, minimize, close:**
* **Open** starts capturing for that agent and shows the panel.
* **Minimize** collapses the panel but **keeps capturing** in the background, so you can reopen it later and review everything since you opened it.
* **Close** stops capturing and clears that agent's buffer.
Capture is in-memory only - it does not survive an app restart, and the buffer is bounded so a long run can't grow memory without limit (the oldest thoughts are dropped once the cap is reached, noted as "trimmed" in the panel header). Running several Auto Runs at once? Each agent captures into its own independent stream; opening the panel for one agent never mixes in another's thoughts.
## Session Isolation
Each task executes in a completely fresh AI session with its own unique session ID. This provides:
* **Clean context** - No conversation history bleeding between tasks
* **Predictable behavior** - Tasks in looping playbooks execute identically each iteration
* **Independent execution** - The agent approaches each task without memory of previous work
This isolation is critical for playbooks with `Reset on Completion` documents that loop indefinitely. Each loop creates a fresh working copy from the original document, and the AI approaches it without memory of previous iterations.
> **Note:** [Nudge messages](./general-usage#creating-agents) configured on an agent do not apply to Auto Run tasks. Nudge messages are only appended to interactive AI messages typed by the user. If you need persistent instructions for Auto Run tasks, include them directly in your task document or use environment variables.
## Environment Variables
Maestro sets environment variables that your agent hooks can use to customize behavior:
| Variable | Value | Description |
| ------------------------- | ----- | ---------------------------------------------------------------- |
| `MAESTRO_SESSION_RESUMED` | `1` | Set when resuming an existing session (not set for new sessions) |
**Example: Conditional Hook Execution**
Since Maestro spawns a new agent process for each message (batch mode), agent "session start" hooks will run on every turn. Use `MAESTRO_SESSION_RESUMED` to skip hooks on resumed sessions:
```bash theme={"theme":"dracula"}
# In your agent's session start hook
[ "$MAESTRO_SESSION_RESUMED" = "1" ] && exit 0
# ... rest of your hook logic for new sessions only
```
This works with any agent provider (Claude Code, Codex, OpenCode) since the environment variable is set by Maestro before spawning the agent process.
## History & Tracking
Each completed task is logged to the History panel with:
* **AUTO** label indicating automated execution
* **Session ID** pill (clickable to jump to that AI conversation)
* **Summary** of what the agent accomplished
* **Full response** viewable by clicking the entry
**Keyboard navigation in History**:
* `Up/Down Arrow` - Navigate entries
* `Enter` - View full response
* `Esc` - Close detail view and return to list
## Expanded Editor View
For editing complex Auto Run documents, use the **Expanded Editor** - a fullscreen modal that provides more screen real-estate.
**To open the Expanded Editor:**
* Click the **expand icon** (↗️) in the top-right corner of the Auto Run panel
* Or press `Cmd+Shift+E` (Mac) / `Ctrl+Shift+E` (Windows/Linux) to toggle - works from anywhere in the interface, even when the Auto Run panel is closed
* Or open the Command Palette (`Cmd+K`) and pick **Auto Run Expanded Preview**
### Configuring a Goal Run
Three inputs configure a run:
* **Goal** - what you want accomplished, in plain language (e.g., "Migrate the settings store from Redux to Zustand and keep all tests green").
* **Exit Criteria** - what "done" looks like and when the agent should declare a deadlock instead of spinning. This guides the agent; it is **not** matched automatically.
* **Iteration Limit** - a cap on how many iterations may run, or **Infinite** to run until the goal is reached or a deadlock is detected.
Like Spec-Driven runs, a goal run can be [dispatched into an isolated git worktree](#run-in-worktree) so your main working tree stays clean.
### Progress Markers
At the end of every iteration the agent reports an honest 0-100 self-assessment on its own line. The engine reads this to drive the progress bar and decide whether to run again:
```html theme={"theme":"dracula"}
```
The `| rationale` note after the number is optional but shows up in the progress UI. A response with no progress marker is treated as zero progress and counts toward a stall.
### How a Goal Run Stops
A goal run ends on any of four conditions:
* **Completed** - the agent reports `progress 100`, or emits the explicit marker ``.
* **Deadlock** - the agent hits a true blocker it cannot work around and declares it with ``.
* **Max iterations** - a finite iteration limit is reached before the goal completes.
* **Stalled** - progress doesn't move upward for three iterations in a row, so the run stops instead of spinning.
The stop reason and final progress are recorded in the **History** panel.
## Progress Tracking
The runner will:
* Process tasks serially from top to bottom
* Skip documents with no unchecked tasks
* Show progress: "Document X of Y" and "Task X of Y"
* Mark tasks as complete (`- [x]`) when done
* Log each completion to the **History** panel
## Thought Stream
While a run is active, you can watch the agent's live reasoning without changing any settings. In the **Auto Run** card, click **View Thoughts** (the brain icon) to open the **Thought Stream** - a floating, searchable panel that streams the agent's thinking as it works.
It works the same for **Spec-Driven** and **Goal-Driven** runs, because both flow through the same agent. The panel captures the raw reasoning stream directly, so it shows thoughts even when an AI tab's "show thinking" display is turned off.
* **Newest on top** - the live thought sits at the top and grows; scroll down to read the history of the run.
* **Timestamped blocks** - a continuous burst of thinking is grouped into one block with a time stamp; a pause (or a switch between parallel tabs) starts a new block.
* **Formatted** - thoughts render as formatted markdown (headings, lists, bold, inline code, code fences), so structured reasoning stays readable.
* **Search** - filter the captured thoughts with the search box; matches are highlighted.
The button doubles as the live indicator: while capturing it pulses and reads **Capturing**.
**Open, minimize, close:**
* **Open** starts capturing for that agent and shows the panel.
* **Minimize** collapses the panel but **keeps capturing** in the background, so you can reopen it later and review everything since you opened it.
* **Close** stops capturing and clears that agent's buffer.
Capture is in-memory only - it does not survive an app restart, and the buffer is bounded so a long run can't grow memory without limit (the oldest thoughts are dropped once the cap is reached, noted as "trimmed" in the panel header). Running several Auto Runs at once? Each agent captures into its own independent stream; opening the panel for one agent never mixes in another's thoughts.
## Session Isolation
Each task executes in a completely fresh AI session with its own unique session ID. This provides:
* **Clean context** - No conversation history bleeding between tasks
* **Predictable behavior** - Tasks in looping playbooks execute identically each iteration
* **Independent execution** - The agent approaches each task without memory of previous work
This isolation is critical for playbooks with `Reset on Completion` documents that loop indefinitely. Each loop creates a fresh working copy from the original document, and the AI approaches it without memory of previous iterations.
> **Note:** [Nudge messages](./general-usage#creating-agents) configured on an agent do not apply to Auto Run tasks. Nudge messages are only appended to interactive AI messages typed by the user. If you need persistent instructions for Auto Run tasks, include them directly in your task document or use environment variables.
## Environment Variables
Maestro sets environment variables that your agent hooks can use to customize behavior:
| Variable | Value | Description |
| ------------------------- | ----- | ---------------------------------------------------------------- |
| `MAESTRO_SESSION_RESUMED` | `1` | Set when resuming an existing session (not set for new sessions) |
**Example: Conditional Hook Execution**
Since Maestro spawns a new agent process for each message (batch mode), agent "session start" hooks will run on every turn. Use `MAESTRO_SESSION_RESUMED` to skip hooks on resumed sessions:
```bash theme={"theme":"dracula"}
# In your agent's session start hook
[ "$MAESTRO_SESSION_RESUMED" = "1" ] && exit 0
# ... rest of your hook logic for new sessions only
```
This works with any agent provider (Claude Code, Codex, OpenCode) since the environment variable is set by Maestro before spawning the agent process.
## History & Tracking
Each completed task is logged to the History panel with:
* **AUTO** label indicating automated execution
* **Session ID** pill (clickable to jump to that AI conversation)
* **Summary** of what the agent accomplished
* **Full response** viewable by clicking the entry
**Keyboard navigation in History**:
* `Up/Down Arrow` - Navigate entries
* `Enter` - View full response
* `Esc` - Close detail view and return to list
## Expanded Editor View
For editing complex Auto Run documents, use the **Expanded Editor** - a fullscreen modal that provides more screen real-estate.
**To open the Expanded Editor:**
* Click the **expand icon** (↗️) in the top-right corner of the Auto Run panel
* Or press `Cmd+Shift+E` (Mac) / `Ctrl+Shift+E` (Windows/Linux) to toggle - works from anywhere in the interface, even when the Auto Run panel is closed
* Or open the Command Palette (`Cmd+K`) and pick **Auto Run Expanded Preview**
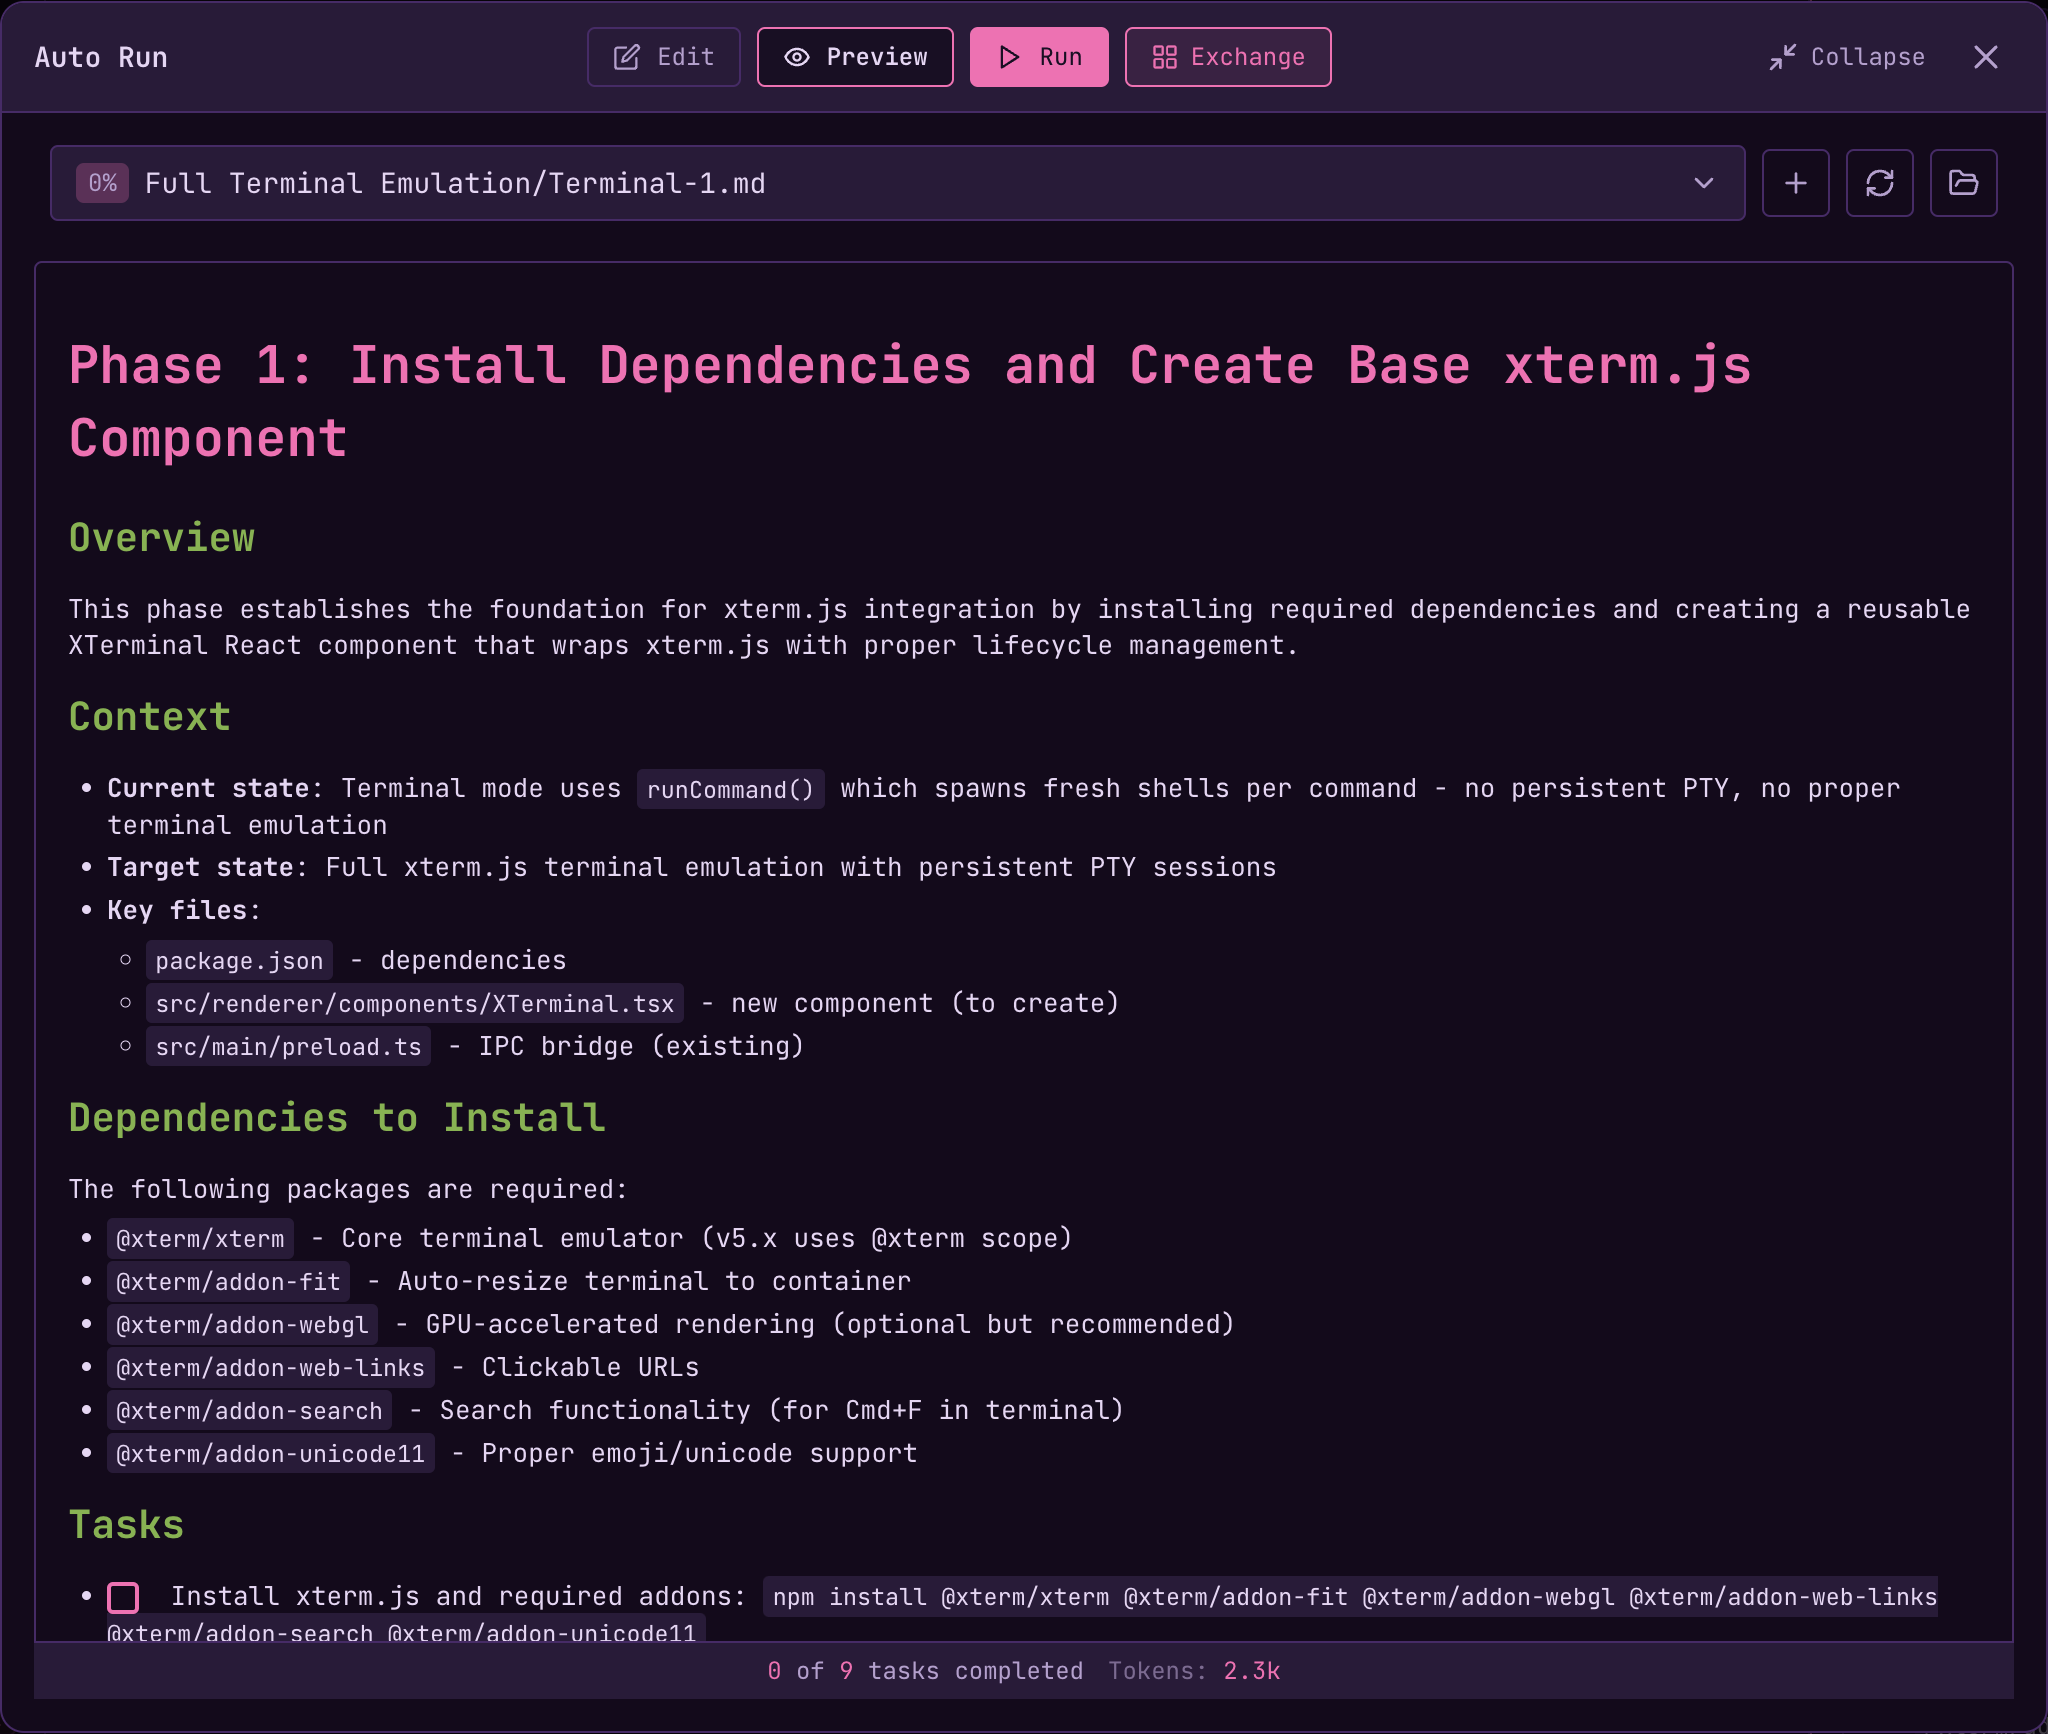 The Expanded Editor provides:
* **Edit/Preview toggle** - Switch between editing markdown and previewing rendered output
* **Document selector** - Switch between documents without closing the modal
* **Run controls** - Start, stop, and monitor Auto Run progress from the expanded view
* **Task progress** - See "X of Y tasks completed" and token count at the bottom
* **Full toolbar** - Create new documents, refresh, and open folder
Click **Collapse** or press `Esc` to return to the sidebar panel view.
> **Maestro Pro Tip - a scratch pad from anywhere:** Because `Cmd+Shift+E` and the Command Palette open the Expanded Editor from anywhere (the Auto Run panel doesn't need to be open), it doubles as an always-available scratch pad. Keep a throwaway document in your Auto Run folder and, as ideas surface mid-session, pop open the editor and jot down tasks you want to kick off later. When you wrap up your interactive work, run that document to dispatch the whole batch at once.
## Saving Documents
Save your changes with `Cmd+S` (Mac) or `Ctrl+S` (Windows/Linux), or click the **Save** button in the editor footer. The editor shows "Unsaved changes" and a **Revert** button when you have pending edits. Full undo/redo support with `Cmd+Z` / `Cmd+Shift+Z`.
**Note**: Switching documents discards unsaved changes. Save before switching if you want to preserve your edits.
## Image Support
Paste images directly into your documents. Images are saved to an `images/` subfolder with relative paths for portability.
## Stopping the Runner
Click the **Stop** button at any time. The runner will:
* Complete the current task before stopping
* Preserve all completed work
* Allow you to resume later by clicking Run again
## Auto-Resume on Limit
If an agent pauses mid-run because it hit a provider limit (a rate, token, or credit limit), Maestro can pick the run back up on its own once the window reopens - so you can queue a batch of work, walk away, and come back to it finished. Enable it in **Settings → General → Auto-Resume on Limit**. Three settings drive it:
* **Auto-Resume on Limit** (on by default) - the master toggle.
* **Check interval** (default 2 hours) - how often Maestro re-checks each paused agent.
* **Give up after** (default 7 days) - if an agent is still stuck this long after the first pause, Maestro stops retrying it, leaves it paused, and posts a one-time notice so you can resume manually.
How it decides to resume: for Claude it reads your actual plan usage and only resumes when credits are genuinely available again; for every other provider (and Claude on an SSH remote) it simply retries on the interval - if the limit is still in force the agent re-pauses and the next check tries again. Probing is cheap, so it keeps trying the whole window.
This survives a full app restart. If you reboot while an agent is limit-paused, Maestro restores the pause and resumes the **agent's conversation** (it continues from its own transcript) and drains any work you had queued. One caveat: the Auto Run / Goal-Driven **loop controller** does not survive a restart - the agent session and its queued messages resume, but the orchestration loop that was stepping through your document does not pick back up automatically. Manually resolving the error, or manually resuming or stopping the agent, always takes precedence and cancels auto-resume for that agent.
## Halt Marker (Agent Early Exit)
Sometimes the agent itself discovers that the rest of the playbook cannot meaningfully proceed - a missing dependency, a broken precondition, an ambiguous spec it cannot resolve, or a destructive change it refuses to make. In that case the agent can abort the entire run by writing a halt marker into the current document:
```html theme={"theme":"dracula"}
```
When the engine re-reads the document after the task and finds this marker, it stops dispatch immediately:
* No further tasks in the current document
* No further documents in the playbook
* The reason text is recorded in the History panel
* A `halt` event is emitted to the JSONL stream, followed by a `complete` event with `success: false` and the same reason
The bare form `` works without a reason, but agents are instructed to always include one. The agent should leave the unfinishable task **unchecked** so you can see exactly where execution stopped.
This is distinct from clicking **Stop** (a manual user action) or a single task simply failing (which by default does **not** halt the playbook - Auto Run is designed to run independent tasks, so one failure doesn't invalidate the rest).
A stale halt marker left in a document will block re-runs with an error - Auto Run refuses to start so previously-halted work isn't silently replayed. Remove the marker before launching the playbook again.
## Parallel Auto Runs
Auto Run can execute in parallel across different agents without conflicts - each agent works in its own project directory, so there's no risk of clobbering each other's work.
**Same project, parallel work:** To run multiple Auto Runs in the same repository simultaneously, create worktree sub-agents from the git branch menu (see [Git Worktrees](./git-worktrees)). Each worktree operates in an isolated directory with its own branch, enabling true parallel task execution on the same codebase.
### Run in Worktree
You can dispatch an Auto Run directly into a new git worktree from the run configuration modal. This spins up an isolated branch and directory for the entire run, keeping your main working tree clean.
The Expanded Editor provides:
* **Edit/Preview toggle** - Switch between editing markdown and previewing rendered output
* **Document selector** - Switch between documents without closing the modal
* **Run controls** - Start, stop, and monitor Auto Run progress from the expanded view
* **Task progress** - See "X of Y tasks completed" and token count at the bottom
* **Full toolbar** - Create new documents, refresh, and open folder
Click **Collapse** or press `Esc` to return to the sidebar panel view.
> **Maestro Pro Tip - a scratch pad from anywhere:** Because `Cmd+Shift+E` and the Command Palette open the Expanded Editor from anywhere (the Auto Run panel doesn't need to be open), it doubles as an always-available scratch pad. Keep a throwaway document in your Auto Run folder and, as ideas surface mid-session, pop open the editor and jot down tasks you want to kick off later. When you wrap up your interactive work, run that document to dispatch the whole batch at once.
## Saving Documents
Save your changes with `Cmd+S` (Mac) or `Ctrl+S` (Windows/Linux), or click the **Save** button in the editor footer. The editor shows "Unsaved changes" and a **Revert** button when you have pending edits. Full undo/redo support with `Cmd+Z` / `Cmd+Shift+Z`.
**Note**: Switching documents discards unsaved changes. Save before switching if you want to preserve your edits.
## Image Support
Paste images directly into your documents. Images are saved to an `images/` subfolder with relative paths for portability.
## Stopping the Runner
Click the **Stop** button at any time. The runner will:
* Complete the current task before stopping
* Preserve all completed work
* Allow you to resume later by clicking Run again
## Auto-Resume on Limit
If an agent pauses mid-run because it hit a provider limit (a rate, token, or credit limit), Maestro can pick the run back up on its own once the window reopens - so you can queue a batch of work, walk away, and come back to it finished. Enable it in **Settings → General → Auto-Resume on Limit**. Three settings drive it:
* **Auto-Resume on Limit** (on by default) - the master toggle.
* **Check interval** (default 2 hours) - how often Maestro re-checks each paused agent.
* **Give up after** (default 7 days) - if an agent is still stuck this long after the first pause, Maestro stops retrying it, leaves it paused, and posts a one-time notice so you can resume manually.
How it decides to resume: for Claude it reads your actual plan usage and only resumes when credits are genuinely available again; for every other provider (and Claude on an SSH remote) it simply retries on the interval - if the limit is still in force the agent re-pauses and the next check tries again. Probing is cheap, so it keeps trying the whole window.
This survives a full app restart. If you reboot while an agent is limit-paused, Maestro restores the pause and resumes the **agent's conversation** (it continues from its own transcript) and drains any work you had queued. One caveat: the Auto Run / Goal-Driven **loop controller** does not survive a restart - the agent session and its queued messages resume, but the orchestration loop that was stepping through your document does not pick back up automatically. Manually resolving the error, or manually resuming or stopping the agent, always takes precedence and cancels auto-resume for that agent.
## Halt Marker (Agent Early Exit)
Sometimes the agent itself discovers that the rest of the playbook cannot meaningfully proceed - a missing dependency, a broken precondition, an ambiguous spec it cannot resolve, or a destructive change it refuses to make. In that case the agent can abort the entire run by writing a halt marker into the current document:
```html theme={"theme":"dracula"}
```
When the engine re-reads the document after the task and finds this marker, it stops dispatch immediately:
* No further tasks in the current document
* No further documents in the playbook
* The reason text is recorded in the History panel
* A `halt` event is emitted to the JSONL stream, followed by a `complete` event with `success: false` and the same reason
The bare form `` works without a reason, but agents are instructed to always include one. The agent should leave the unfinishable task **unchecked** so you can see exactly where execution stopped.
This is distinct from clicking **Stop** (a manual user action) or a single task simply failing (which by default does **not** halt the playbook - Auto Run is designed to run independent tasks, so one failure doesn't invalidate the rest).
A stale halt marker left in a document will block re-runs with an error - Auto Run refuses to start so previously-halted work isn't silently replayed. Remove the marker before launching the playbook again.
## Parallel Auto Runs
Auto Run can execute in parallel across different agents without conflicts - each agent works in its own project directory, so there's no risk of clobbering each other's work.
**Same project, parallel work:** To run multiple Auto Runs in the same repository simultaneously, create worktree sub-agents from the git branch menu (see [Git Worktrees](./git-worktrees)). Each worktree operates in an isolated directory with its own branch, enabling true parallel task execution on the same codebase.
### Run in Worktree
You can dispatch an Auto Run directly into a new git worktree from the run configuration modal. This spins up an isolated branch and directory for the entire run, keeping your main working tree clean.
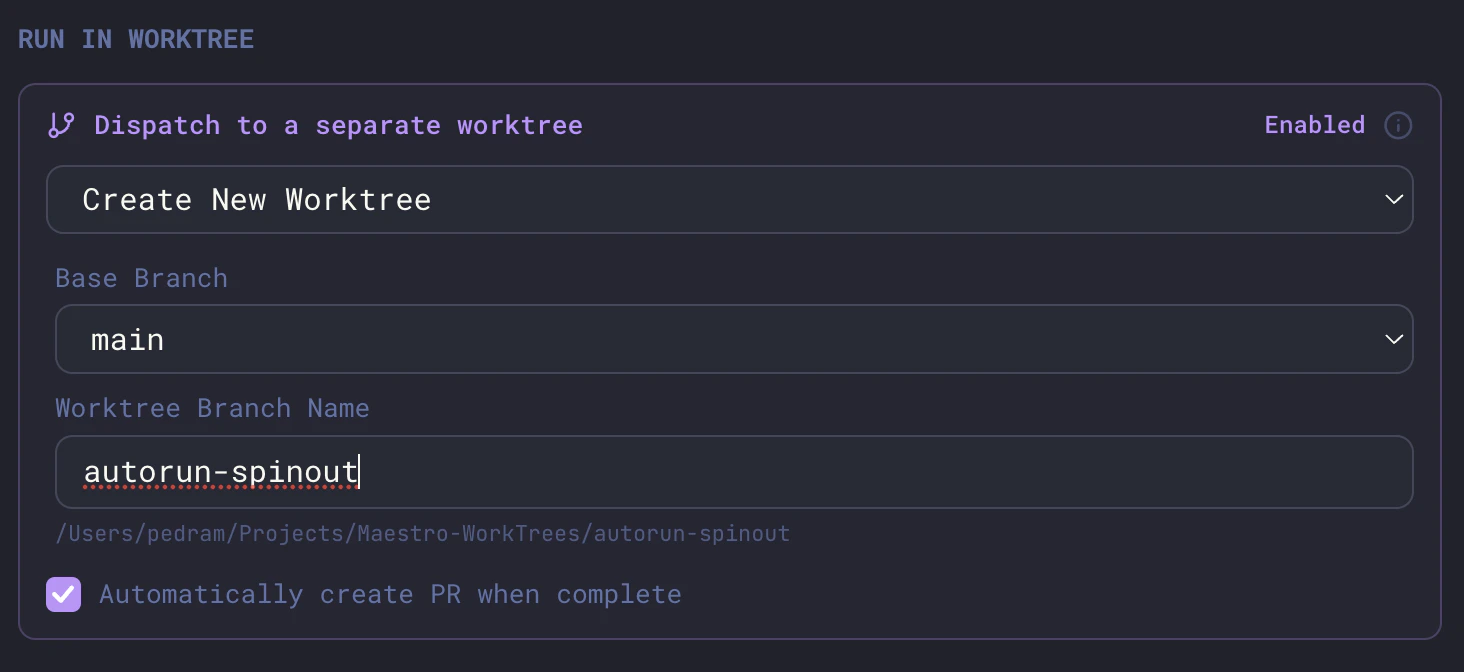 | Option | Description |
| ----------------------------------- | ------------------------------------------------------------------------------------------ |
| **Dispatch to a separate worktree** | Toggle to enable worktree isolation for this run |
| **Worktree selection** | Create a new worktree or select an existing one |
| **Base Branch** | The branch to base the new worktree on (e.g., `main`) |
| **Worktree Branch Name** | Name for the new branch - also used as the worktree directory name |
| **Automatically create PR** | When checked, Maestro opens a pull request from the worktree branch when the run completes |
This is the recommended workflow for longer Auto Runs - your main branch stays untouched, all changes land on a dedicated branch, and you get a PR at the end ready for review.
| Option | Description |
| ----------------------------------- | ------------------------------------------------------------------------------------------ |
| **Dispatch to a separate worktree** | Toggle to enable worktree isolation for this run |
| **Worktree selection** | Create a new worktree or select an existing one |
| **Base Branch** | The branch to base the new worktree on (e.g., `main`) |
| **Worktree Branch Name** | Name for the new branch - also used as the worktree directory name |
| **Automatically create PR** | When checked, Maestro opens a pull request from the worktree branch when the run completes |
This is the recommended workflow for longer Auto Runs - your main branch stays untouched, all changes land on a dedicated branch, and you get a PR at the end ready for review.