Run AI agents on remote machines via SSH instead of locally. This enables you to leverage powerful remote servers, access tools not installed on your local machine, or work with projects that must run in specific environments.
Overview
SSH Remote Execution wraps agent commands in SSH, executing them on a configured remote host while streaming output back to Maestro. Your local Maestro instance remains the control center, but the AI agent runs remotely.
Use cases:
- Run agents on a powerful cloud VM with more CPU/RAM
- Access tools or SDKs installed only on specific servers
- Work with codebases that require particular OS or architecture
- Execute agents in secure/isolated environments
- Coordinate multiple agents across different machines in Group Chat
- Run Auto Run playbooks on remote projects
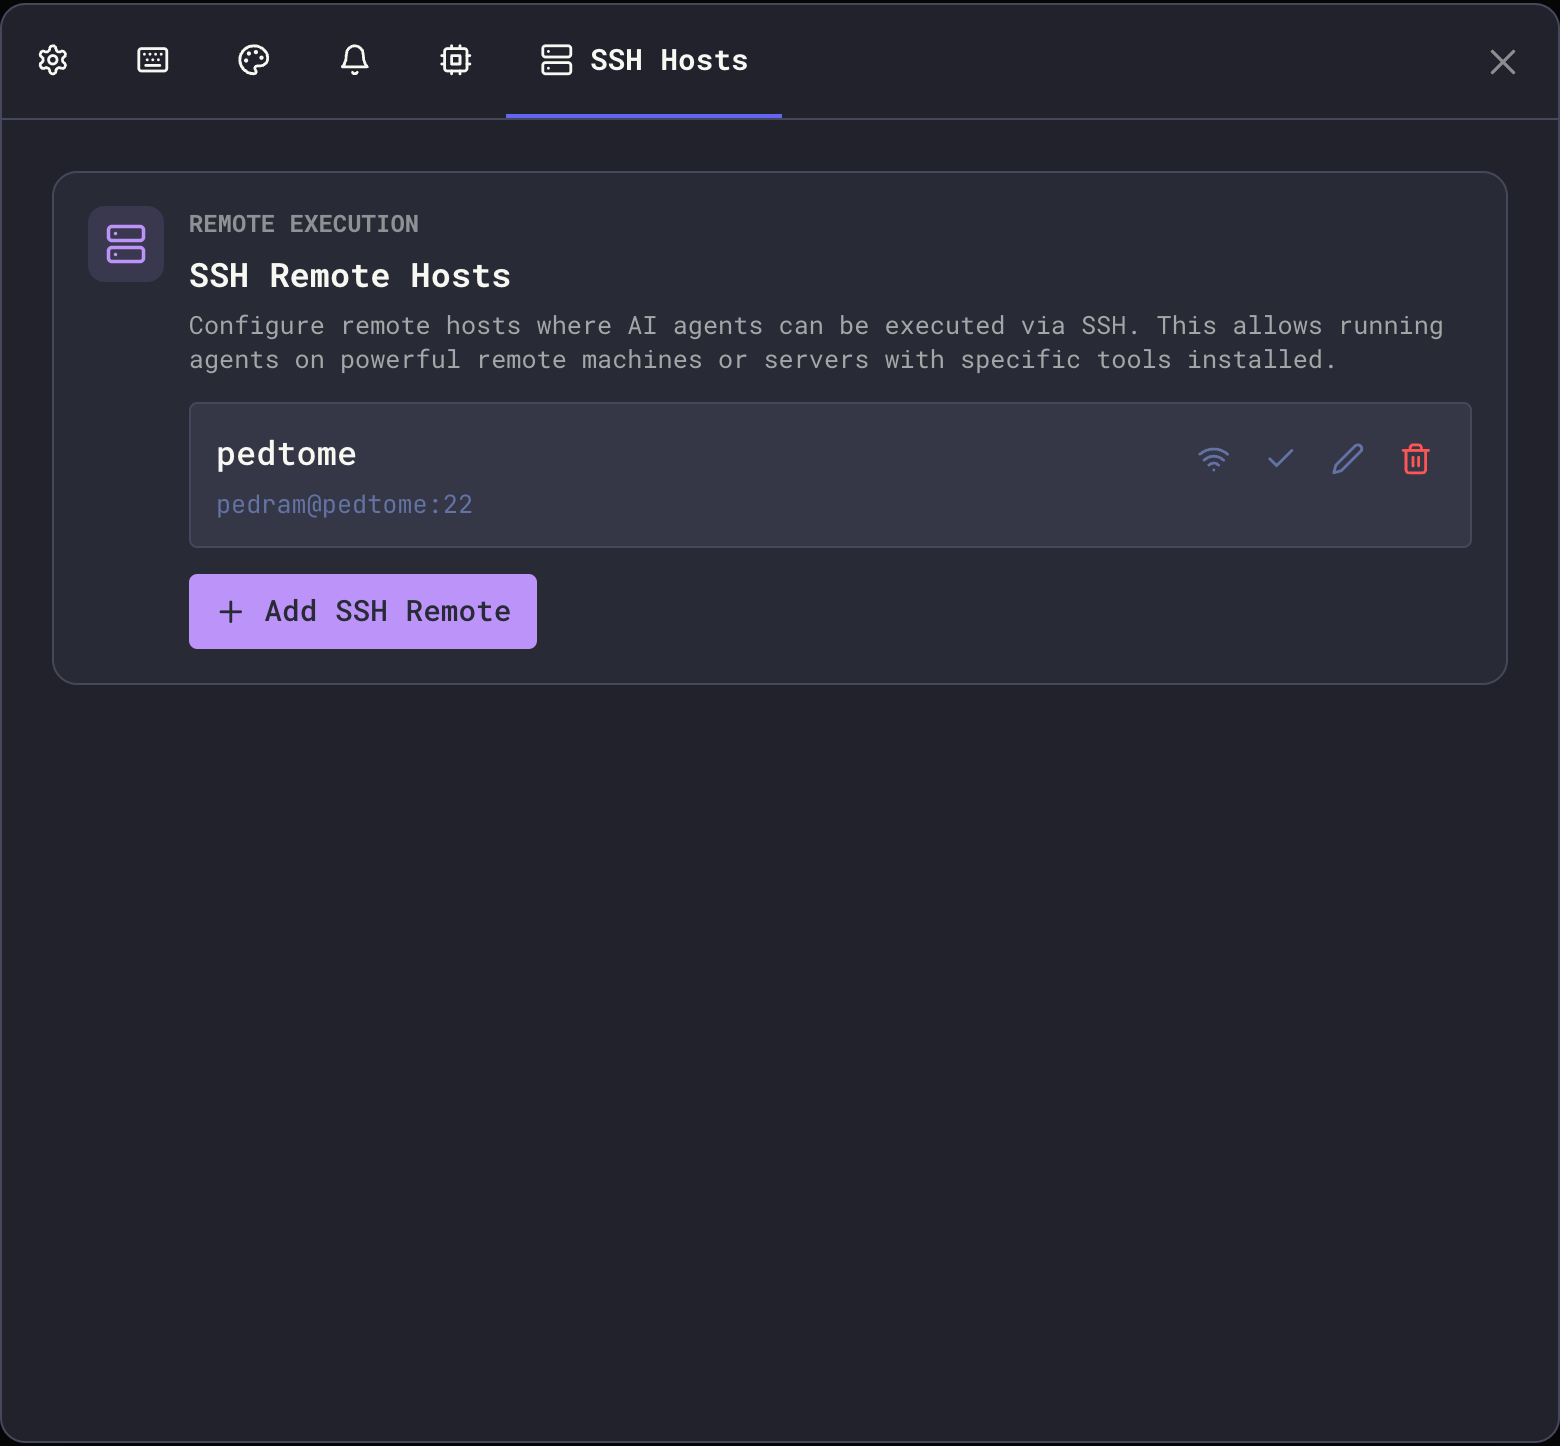
Configuring SSH Remotes
Adding a Remote Host
- Open Settings (
Cmd+, / Ctrl+,)
- Navigate to the SSH Hosts tab
- Click Add SSH Remote
- Configure the connection:
| Field | Description |
|---|
| Name | Display name for this remote (e.g., “Dev Server”, “GPU Box”) |
| Host | Hostname or IP address (or SSH config Host pattern when using SSH config) |
| Port | SSH port (default: 22) |
| Username | SSH username for authentication (optional when using SSH config) |
| Private Key Path | Path to your SSH private key (optional when using SSH config) |
| Remote Working Directory | Optional default working directory on the remote host |
| Environment Variables | Optional key-value pairs to set on the remote |
| Enabled | Toggle to temporarily disable without deleting |
- Click Test Connection to verify connectivity
- Click Save to store the configuration
Using SSH Config File
Maestro can import connection settings from your ~/.ssh/config file, making setup faster and more consistent with your existing SSH workflow.
Importing from SSH Config
When adding a new remote, Maestro automatically detects hosts defined in your SSH config:
- Click Add SSH Remote
- If SSH config hosts are detected, you’ll see an Import from SSH Config dropdown
- Select a host to auto-fill settings from your config
- The form shows “Using SSH Config” indicator when importing
How It Works
When using SSH config mode:
- Host becomes the SSH config Host pattern (e.g.,
dev-server instead of 192.168.1.100)
- Username and Private Key Path become optional - SSH inherits them from your config
- Port defaults to your config’s value (only sent to SSH if overriding a non-default port)
- You can still override any field to customize the connection
Example ~/.ssh/config:
Host dev-server
    HostName 192.168.1.100
    User developer
    IdentityFile ~/.ssh/dev_key
    Port 2222

Host gpu-box
    HostName gpu.example.com
    User admin
    IdentityFile ~/.ssh/gpu_key
    ProxyJump bastion
- Select “dev-server” from the dropdown
- Leave username/key fields empty (inherited from config)
- Optionally override specific settings
- Benefit from advanced features like
ProxyJump for bastion hosts
Field Labels
When using SSH config mode, field labels indicate which values are optional:
- Username (optional) - leave empty to use SSH config’s
User
- Private Key Path (optional) - leave empty to use SSH config’s
IdentityFile
Clearing SSH Config Mode
To switch back to manual configuration:
- Click the × button next to “Using SSH Config” indicator
- Fill in all required fields manually
Connection Testing
Before saving, you can test your SSH configuration:
- Basic test: Verifies SSH connectivity and authentication
- Agent test: Checks if the AI agent command is available on the remote host
A successful test shows the remote hostname. Failed tests display specific error messages to help diagnose issues.
Setting a Global Default
Click the checkmark icon next to any remote to set it as the global default. When set:
- The “Default” badge appears next to the remote name
- The default remote is highlighted in selection dropdowns
- New sessions still require explicit selection - the default serves as a visual indicator of your preferred remote
Click the checkmark again to clear the default.
The global default is a convenience marker, not an automatic setting. Each session must explicitly select an SSH remote via the “SSH Remote Execution” dropdown in the New Agent dialog or session configuration.
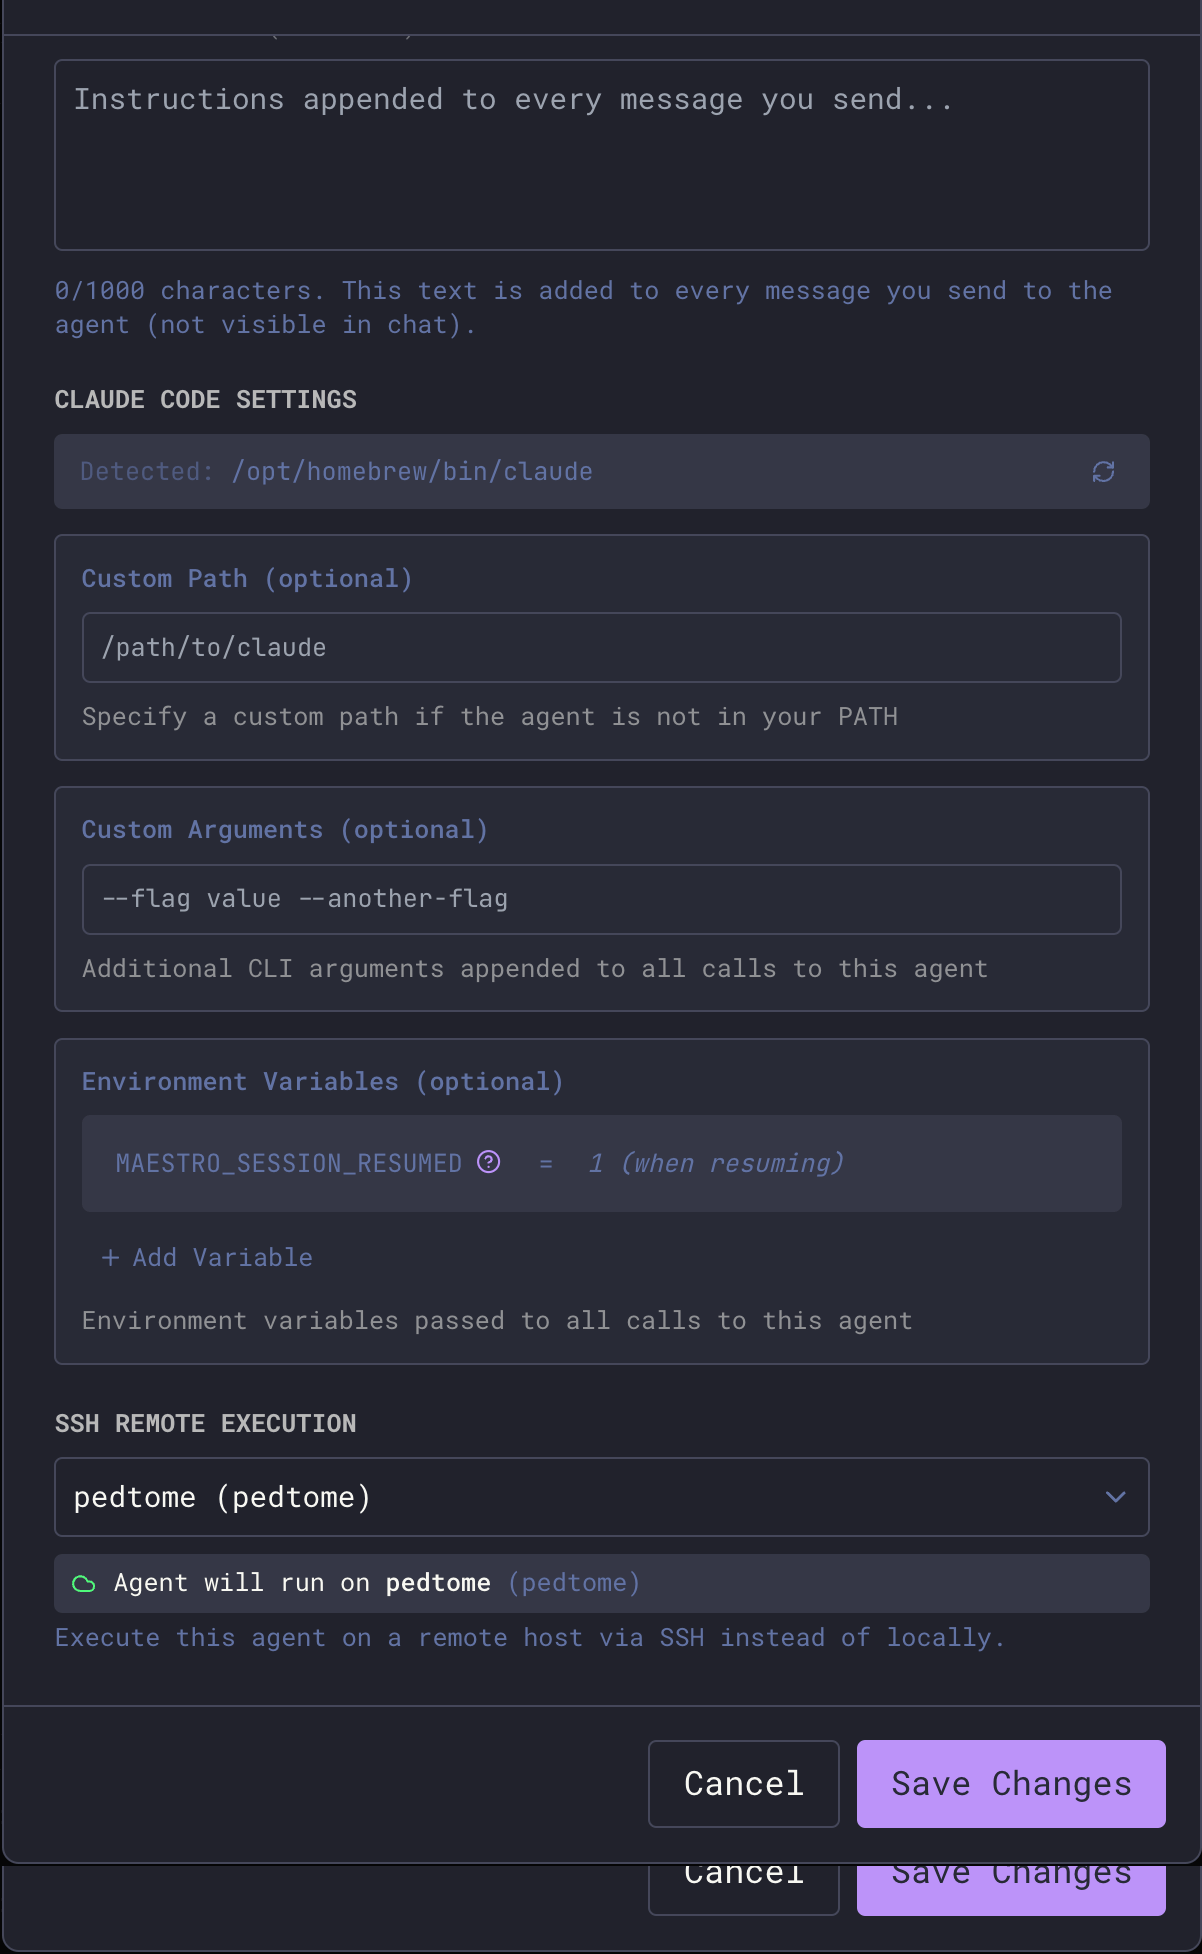
Per-Session Configuration
Each session can have its own SSH remote setting configured when creating the session or editing its configuration.
Configuring a Session
- When creating a new agent session (via New Agent dialog or the wizard), find the SSH Remote Execution dropdown
- Select an option:
| Option | Behavior |
|---|
| Local Execution | Runs the agent on your local machine (default) |
| [Remote Name] | Runs the agent on the specified SSH remote host |
How It Works
SSH remote execution is configured at the session level:
- When you create a new session, you choose whether it runs locally or on a specific remote
- The configuration is saved with the session and persists across restarts
- Each session maintains its own SSH setting independently
- Changing a session’s SSH remote requires editing the session configuration
Status Visibility
When a session is running via SSH remote, you can easily identify it:
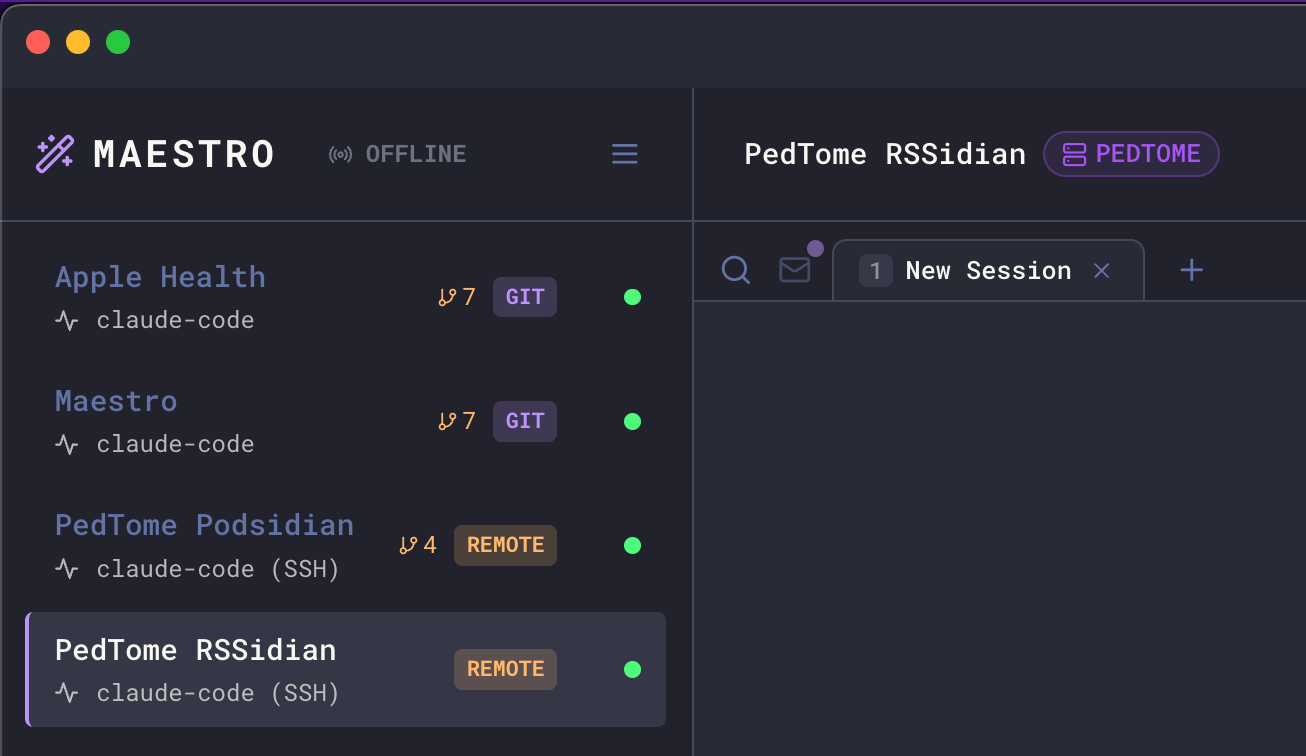
- REMOTE pill - Appears in the Left Bar next to the session, indicating it’s configured for remote execution
- Host name badge - Displayed in the Main Panel header showing which SSH host the agent is running on (e.g., “PEDTOME”)
- Agent type indicator - Shows “claude-code (SSH)” to clarify the execution mode
- Connection state reflects SSH connectivity
- Errors are detected and displayed with SSH-specific context
Full Remote Capabilities
Remote agents support all the features you’d expect from local agents:
Remote File System Access
The File Explorer works seamlessly with remote agents:
- Browse files and directories on the remote host
- Open and edit files directly
- Use
@ file mentions to reference remote files in prompts
Remote Auto Run
Run Auto Run playbooks on remote projects:
- Auto Run documents can reference files on the remote host
- Task execution happens on the remote machine
- Progress and results stream back to Maestro in real-time
Remote Git Worktrees
Create and manage git worktrees on remote repositories:
- Worktree sub-agents run on the same remote host
- Branch isolation works just like local worktrees
- PR creation connects to the remote repository
Remote Command Terminal
The Command Terminal executes commands on the remote host:
- Full PTY support for interactive commands
- Tab completion works with remote file paths
- Command history is preserved per-session
Group Chat with Remote Agents
Remote agents can participate in Group Chat alongside local agents. This enables powerful cross-machine collaboration:
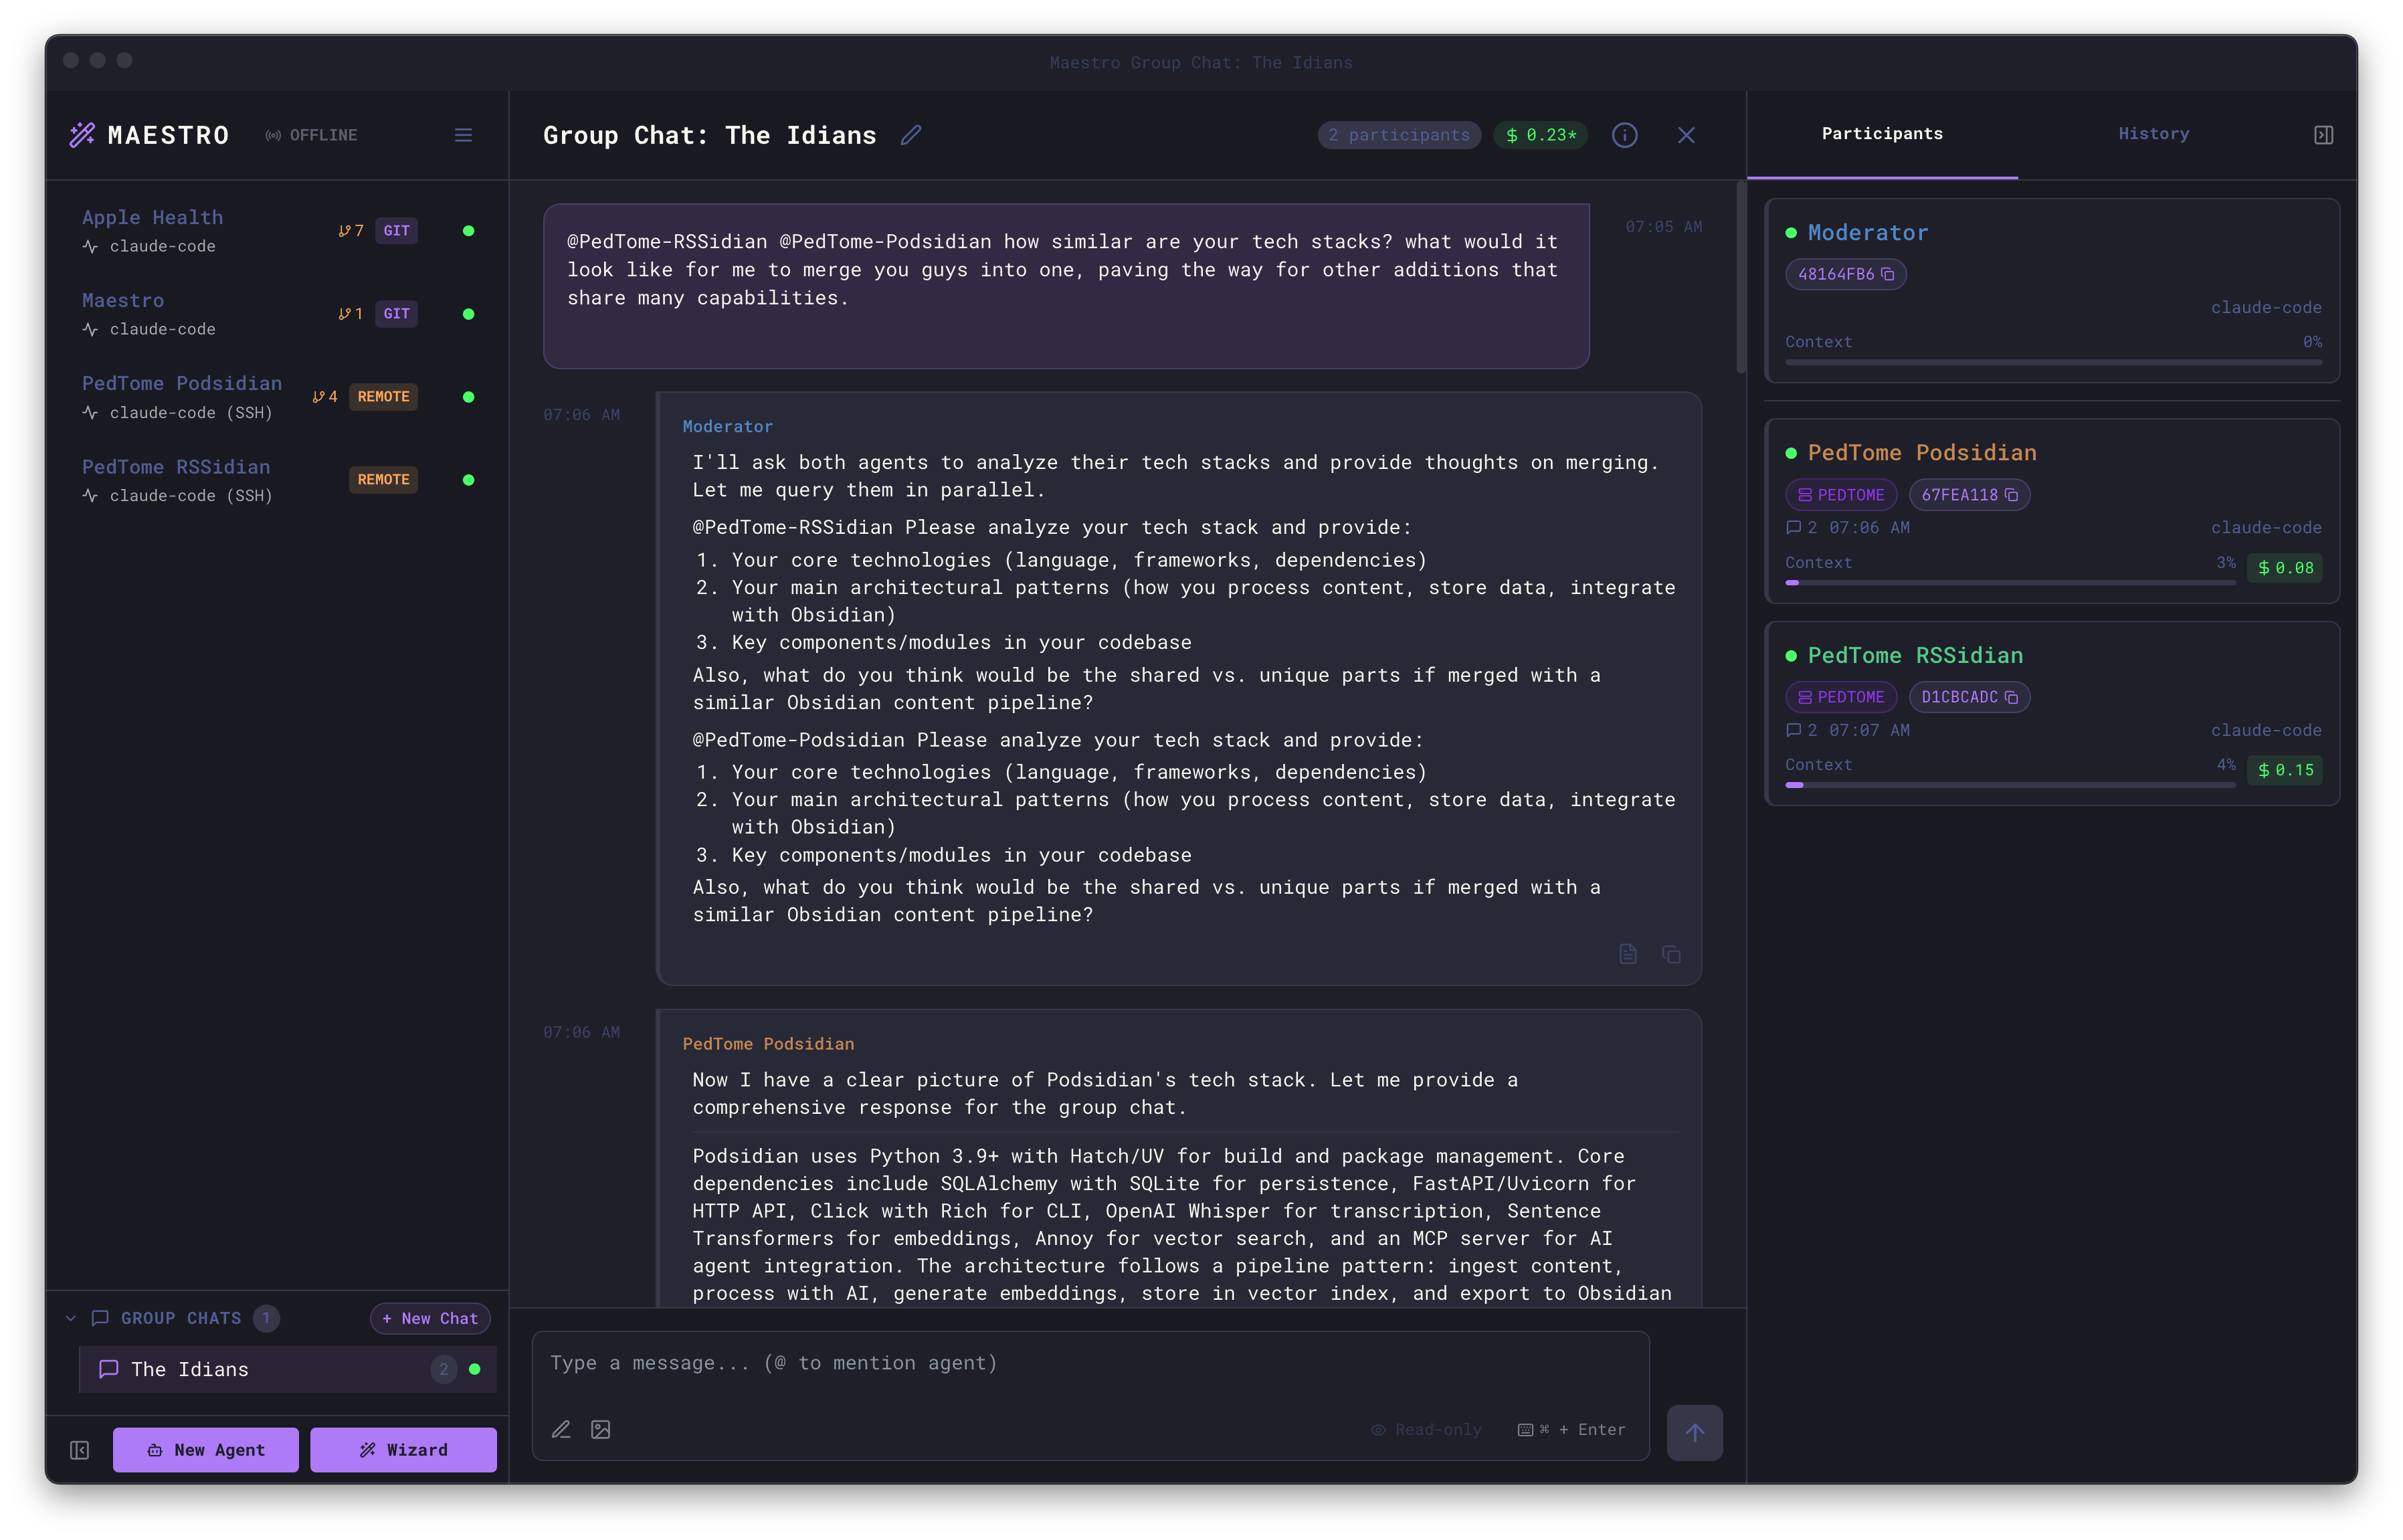
- Mix local and remote agents in the same conversation
- The moderator can be local or remote
- Each agent works in their own environment (local or remote)
- Synthesize information across different machines and codebases
This is especially useful for:
- Comparing implementations across different environments
- Coordinating changes that span multiple servers
- Getting perspectives from agents with access to different resources
Collaborating over SSH
When multiple people (or the same person from multiple machines) work on a shared project via SSH, Maestro can synchronize history entries across all participants. This gives everyone visibility into what work has been done - regardless of which machine initiated it.
How Shared History Works
Each Maestro instance writes a per-hostname history file to the project’s .maestro/history/ directory on the remote host:
project/
  .maestro/
    history/
      history-pedbook.jsonl       # entries from pedbook
      history-pedopswat.jsonl     # entries from pedopswat
      history-stephan.jsonl       # entries from stephan
- Each machine writes only its own file - no conflicts between writers
- When loading history, Maestro merges entries from all other hosts’ files
- Entries are deduplicated by ID and sorted by timestamp
- Remote entries appear with a ☁ Remote pill and the originating hostname in the History panel
Enabling Shared History
Shared history is enabled per-session via the Sync history to remote toggle, which appears in the SSH Remote Execution dropdown when an SSH host is selected:
- Create or edit an agent session
- Select an SSH remote from the dropdown
- The Sync history to remote checkbox appears below the status indicator (disabled by default)
- When enabled, every history entry is written to both your local Maestro store and the remote project’s
.maestro/history/ directory
Use Case: Same User, Multiple Machines
You have Maestro on your laptop (pedbook) and desktop (pedopswat). Both machines have an agent pointed at the same project on pedopswat:
- pedopswat runs the agent locally - history writes to its local store and
.maestro/history/history-pedopswat.jsonl
- pedbook runs the agent via SSH to pedopswat - history writes to its local store and
.maestro/history/history-pedbook.jsonl on pedopswat
- Both machines see each other’s entries when loading the History panel
Use Case: Team Collaboration on a Shared Server
Multiple team members (pedbook, stephan, mattj) each have Maestro installed locally and SSH into a shared VPS where the project lives. No Maestro is installed on the VPS - just the agent CLI:
- Each person’s Maestro writes to their own
history-<hostname>.jsonl on the VPS
- Each person sees entries from all other team members
- Entries display the originating hostname so you can tell who did what
Entry Limits
Shared history files respect the Maximum Log Buffer setting (Settings → Display). Each hostname’s file retains up to this many entries (default: 5,000). When reading another host’s file, Maestro reads only the most recent entries up to your own buffer limit.
Notes
- Shared history files use JSONL format (one JSON object per line) for safe concurrent appending
- Malformed lines are skipped gracefully - a partial write won’t corrupt the file
- If the SSH connection is unavailable when reading, local history is shown without remote entries (no error displayed)
- The
.maestro/history/ directory is created automatically on first write
- Consider adding
.maestro/history/ to your .gitignore - history is operational data, not source code
Troubleshooting
Authentication Errors
| Error | Solution |
|---|
| ”Permission denied (publickey)“ | Ensure your SSH key is added to the remote’s ~/.ssh/authorized_keys |
| ”Host key verification failed” | Add the host to known_hosts: ssh-keyscan hostname >> ~/.ssh/known_hosts |
| ”Enter passphrase for key” | Use a key without a passphrase, or add it to ssh-agent: ssh-add ~/.ssh/your_key |
Connection Errors
| Error | Solution |
|---|
| ”Connection refused” | Verify SSH server is running on the remote host |
| ”Connection timed out” | Check network connectivity and firewall rules |
| ”Could not resolve hostname” | Verify the hostname/IP is correct |
| ”No route to host” | Check network path to the remote host |
Agent Errors
| Error | Solution |
|---|
| ”Command not found” | Install the AI agent on the remote host |
| ”Agent binary not found” | Ensure the agent is in the remote’s PATH |
Tips
- Import from SSH config - Use the dropdown when adding remotes to import from
~/.ssh/config; saves time and keeps configuration consistent
- Bastion hosts - Use
ProxyJump in your SSH config for multi-hop connections; Maestro inherits this automatically
- Key management - Use
ssh-agent to avoid passphrase prompts
- Connection multiplexing - Maestro respects
ControlMaster, ControlPath, and ControlPersist from your ~/.ssh/config. This is highly recommended if you use hardware security keys (e.g., YubiKey) to avoid repeated touches per connection. Example config:
Host dev-server
    ControlMaster auto
    ControlPath ~/.ssh/sockets/%r@%h-%p
    ControlPersist 600
mkdir -p ~/.ssh/sockets). Use %h, %p, and %r tokens in ControlPath to keep sockets unique per host/port/user.
- Keep-alive - Configure
ServerAliveInterval in SSH config for long sessions
- Test manually first - Verify
ssh host 'claude --version' works before configuring in Maestro
Security Considerations
- SSH keys should have appropriate permissions (
chmod 600)
- Use dedicated keys for Maestro if desired
- Remote working directories should have appropriate access controls
- Environment variables may contain sensitive data; they’re passed via SSH command line
Limitations
- Network latency affects perceived responsiveness
- The remote host must have the agent CLI installed and configured
- Some shell initialization files (
.bashrc, .zshrc) may not be fully sourced - agent commands use $SHELL -lc to ensure PATH availability from login profiles